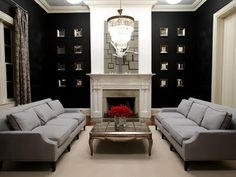
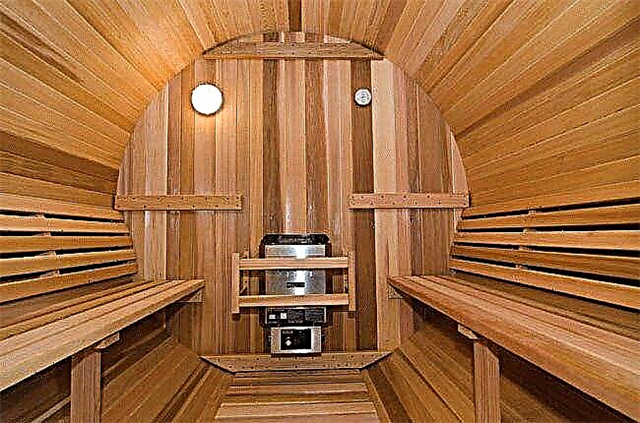
In our country there has always been a special relationship with the bathhouse, for the Slavs, this place was not just a room where you can wash yourself well, it is a whole layer of culture. A sauna in a private house - built with one's own hands, is a longed-for dream of many good hosts. And in this article we will talk in detail about the intricacies of the realization of this dream.
Which bath to build
Of course, installing a bath in a residential building is convenient. You will not need to return to the house along the street, you will not need to erect a separate building, much less trouble with the arrangement of water supply, sewage and electricity. And the price of such a bath is much lower than stand-alone counterparts.
But not every type of bath is suitable for installation in the house. So let's say in a Russian bath the effect is achieved using wet steam, and increased humidity in the house is not desirable. The specificity of Turkish baths is also not very suitable for accommodation in residential buildings.
The most suitable accommodation is a sauna. Currently, the sleds are heated with infrared rays and traditional Finnish ones. Both of these types are perfect for placement in a residential building, then we will talk about the intricacies of installing these baths.
Do I need a project
- As a rule, a project is done when a separate building is being built. For the preparation of such documentation requires special knowledge, so not everyone can do it on their own.
- If you buy a ready-made steam room, then there is an instruction for it, in which the assembly process is described in detail, in which case the preparation of project documentation loses its meaning.
- In the case when you decide to adapt one of the rooms of your house for a bath, it is enough to draw up a sketch, but when compiling it, some conditions should be taken into account.
- The minimum floor height in the steam room should not be less than 2.1 m. But if you have the opportunity, it’s better to do 2.3m, it is not recommended to do higher, since a larger volume will warm up longer.
- The top shelf in the steam room should not be lower than 120 cm.
- The difference between the shelves is at least 40 cm.
- When installing shelves, it is recommended to make a gap between the slats for the circulation of hot air, about 5 mm.
- The volume of the steam room is calculated on the principle of 3m³ for 1 person.
Installation Recommendations
From the point of view of construction, the arrangement of the infrared steam room and the Finnish sauna do not differ significantly. The main difference is that an infrared sauna does not require such a powerful thermal insulation, since the temperature in it does not exceed 60 ° C. Therefore, we will talk about how the Finnish sauna is built at home with our own hands.
Floor mounting
- Directly in the steam room, arranging a wooden floor is not welcome, but if you still decided to make a wooden floor, keep in mind that in the steam room all wooden finishes, including the floor, should not be varnished or any other compounds.
- The best option for a steam room is laying a tiled floor. Installation of the steam room begins with the installation of the floor.
- Initially, waterproofing is laid on the draft floor, it can be polyethylene, roofing felt or modern waterproofing membranes.
- Further, we advise you to lay a layer of extruded polystyrene foam, too thick sheets should not be taken enough 20 - 30 mm.
- Along the perimeter, leave a damper gap of about 10 mm and lay the tiles.Pay attention to the tile adhesive, it must be heat-resistant. On the tiled floor in the steam room, as a rule, removable wooden ladders lie.
Important: a layer of expanded polystyrene is laid on the floor for thermal insulation, you can do without it, but in this case it will take more energy and time to warm up the steam room.
Wall arrangement
- If your house is brick built or made of other block material, you should waterproof the walls. For this, glassine is used, bitumen paper or vapor barrier can be used. The canvas is laid with overlapping stripes and fixed with rails.
Important: Finnish sauna in a wooden house with its own hands is equipped without the use of primary waterproofing on the walls of the steam room.
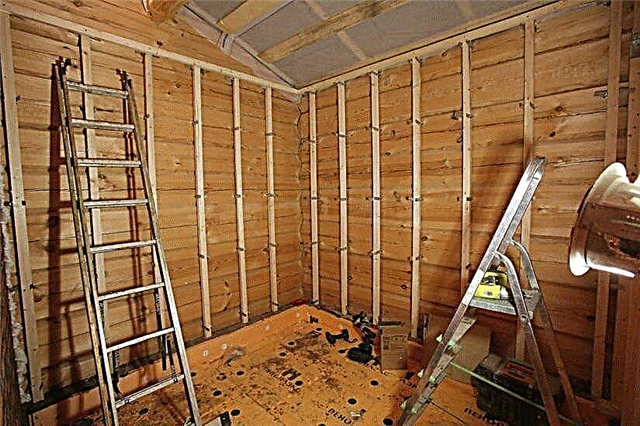
- Next, we proceed to the installation of the insulating frame. To do this, we vertically fill wooden slats on the walls and ceiling. As a rule, bars with a cross section of 50x50 mm are used, but if you have a thickness of insulating mats greater than 50 mm, you should take rails of a larger cross section. The distance between the bars should be equal to the width of the heat-insulating mat.
- It should be noted that at this stage it is necessary to lay the wiring and mount the ventilation ducts, we will talk about the installation rules later.
Benches and doors in the steam room
- As mentioned earlier, too high ceilings in the bath can not be done, the standard ceiling height is 2.1 m. The highest temperature in the steam room is under the ceiling. It follows that the upper rack should be closer to the ceiling, it should be convenient not only to lie or sit on it, but also should be able to work with a broom. Therefore, from the upper shelf to the ceiling, a distance of 1.1 m is left.
- According to the rules, the lower rack should be installed at a height of 65 cm. But at this height of the bench, sitting on it will not be comfortable, the legs will not reach the floor. Therefore, for convenience, another small step is mounted at a height of 25 cm.
- Currently, it is customary to install heat-resistant glass doors in steam rooms. It is not only beautiful, but also useful in terms of psychological comfort. The fact is that a closed, hot space can negatively affect the psyche, and a glass door removes this problem. Naturally, it is better to make the door handles wooden, so as not to get warm. Locks should not be. Maximum magnetic or ball lock.
Furnace installation
- A sauna in a private house with your own hands can be made with heating on wood, but such a stove requires a chimney. And if you decide to make a brick oven, then you need a separate, powerful foundation for it, plus only a professional can lay out a good stove, and his services can be expensive.
Important: the minimum weight of stones for a stove heater is 2.5 kg per 1m³ of volume.
At maximum, you can load up to 6.5 kg per 1 m³, but with a large weight of the stove, it may be necessary to equip the capital foundation.
The video in this article shows the intricacies of choosing and installing a stove for a bath.
Arrangement of ventilation
- An important part of the construction is the arrangement of ventilation. If you neglect this item, you can invest serious money, and get an intolerable atmosphere in the steam room. There are 2 main types of ventilation.
- During the installation of the first system, the inlet, inlet is arranged at the floor level behind the stove heater, and the outlet ventilation shaft is mounted behind the opposite wall, a single ventilation channel combines 2 outlet openings.
- The first is done at 1m from the floor, and the second near the ceiling. A stream of cold air, falling into the steam room, immediately heats up from the stove and then spreads evenly throughout the room.
The video in this article shows the basic principles for installing ventilation.
Output
We do not claim that a do-it-yourself sauna is easy to build in the house, but there is nothing too complicated here.You should just be well prepared and believe in yourself, and from the pages of our site we will tell you how to do it right. Subscribe to updates, and you will receive a lot of valuable information from us, absolutely free.
The video in this article shows the intricacies of building a sauna.
Step 1. Choosing the Right Place
The sauna can be equipped in any accessible room that meets the following requirements: ventilation, low humidity and the absence of drafts. This can be a separate room (small building) or a room in a residential building.
 Where to build a sauna
Below are the characteristics that a proper sauna should have.
- It must have a tiled floor and separate wiring (if we are talking about heating with an electric heater) or a chimney (if you plan to use a wood boiler).
- Suitable booth sizes are determined at the rate of 2.5 m³ per person.
- In the dressing room should be a small table, hanger and benches. If the sauna will be used year-round, then also a heater.
- Shelves for taking procedures need to be equipped in the form of steps with a width of 0.5-0.7 m each.
- The main heater, as noted earlier, can be wood or electric.
Note! Sauna differs from the traditional Russian ban and only low air humidity (10-25%). There are no other fundamental differences - steam is produced through the same moistening of stones, brooms are often used, and the “climax” of bathing procedures in both cases is a jump into a snowdrift or pool with cold water.
| Sauna, recommended temperature and humidity characteristics | Value |
|---|---|
| Ceiling temperature, ° С | 100 |
| Temperature in the middle of the room, ° С | 60-90 |
| Humidity% | 5-20 |
| Temperature in the rest room, ° С | 18-20 |
| Recommended Duration | no more than 2 hours |
| Temperature at the floor, ° С | not less than 40 |
| Absolute humidity, g / m3 | 40-60 |
How to equip a sauna in the house
 Sauna - a type of bath, the device of which is based on the mechanism of heating the air in the room. Therefore, the material used for the construction of the sauna should be indifferent to the influence of high temperatures. An ideal option for arranging a sauna is in a private house, as an extension.
If you are constrained in means in order to call professionals in your field or if you like tinkering, you can make a sauna in the house with your own hands. But for this, you first need to understand where it is better to place a sauna.
A sauna can be constructed in any enclosed space with a good, non-leaking roof, without cracks and holes in the floor and walls, the room must be strong and reliable. Determine whether it is possible to remove ventilation on square meters and supply water, electrical wires.
Calculating the size of the sauna that you will build with your own hands, focus on 2.5-3 cubic meters. m per 1 person, this is enough to feel comfortable and relaxed.
What to make a floor from
The usual wood floor in this case is hardly suitable for a steam room. If you still want to equip the sauna with a plank flooring, it is not recommended to apply a protective varnish on top. The same goes for walls. The high temperature in the cabin provokes the dissolution of harmful substances that will have to be breathed by those who are in the sauna. Such experiments are not only not useful, but also dangerous to human health - over time, they can provoke severe pulmonary diseases.
Therefore, the best option for flooring is tile or a heated floor, which is laid before fixing wooden structures. An ordinary tile, which is faced with bathrooms and restrooms, is suitable. The only caveat - take an interest in buying, what temperature can withstand your favorite sample of building material, because the temperature in the steam room can be 120 degrees.
Caring for the tiles is easy and simple - wash the floor every time you visit the steam room in the house with a disinfectant, remember that non-compliance with hygiene threatens at least the appearance of a fungus on your feet.
Features of the installation of vertical frames
 To make a strong and monolithic sauna, it is necessary to equip the vertical frames on the inner surface:
- Following the brickwork of the walls, fix the glassine. Pergamine is connected to the wall with laths fixed with an overlap. If the wall structures are made of another material, a glassine is not required. What are the properties of glassine? With a water-repellent effect, it provides a high level of vapor barrier. In construction stores, material is sold twisted in rolls of 1 × 20 m in size, the weight of one package is 15 kg. Pergamine can be replaced with lighter and thin bitumen paper.
- Mount the frames in vertical directions using 40 × 60 or 50 × 50 cm bars.
- Now you can proceed with the installation of the frame base of the ceiling.
- At this stage, it is worth worrying about the arrangement of ventilation and power supply, and fire safety should also not be forgotten. To make the sauna in the house safe for visiting, it will be correct to conduct a dry pipe indoors. What is its feature? The dry pipe is equipped with holes made at a special angle. When a fire starts, water flows are sprayed on the steam room and extinguish the fire.
Another option for placing pipes is to lay them not around the perimeter, but directly under the ceiling. But then you need to carry out additional nozzles with spray tips.
If everything is done right and according to the instructions of professionals, it is necessary to fix the valve on the internal plane of ventilation, this will help to prevent the penetration of hot air into other rooms in the house.
Insulation and foil
An excellent insulating material is mineral wool. The roll is carefully laid inside the frame. Building foil will preserve and accumulate the entire spectrum of thermal radiation inside the cabin, which forms the effect of a thermos. With foil, it becomes possible to make the sauna in the house quickly heated and for a long time maintaining high temperature.
What to plant the foil on? Use special adhesive tape or stationery buttons to fix it, so as not to damage the integrity of the fragile surface, act carefully and without rushing.
Lining
Before lining the clapboard, it is necessary to mount a horizontal crate with a cross section of 30 × 40 mm on the wall, each time backing off a distance of 400 mm, set according to the building level. In order to avoid destruction of the lining, it is advisable to equip the transverse frames with a section of 30 × 60 mm, to which benches are attached afterwards.
Clapboard not only processes walls, but also the ceiling. Right now a ventilation valve is provided, equipped with a valve size of 100-150 mm. If the ceiling structure looks like a hinged, it is better to sheathe the ceiling with a lining, and then lay the insulation material.
Which skin is better to choose
 Here you can imagine the following options:
- linden gives a very pleasant aroma, it is believed that it cures pulmonary diseases (it has a slightly pinkish tint),
- alder - expensive wood, pleasant to the body and very soft, but there is a mark on it, even if you just hold it with your fingernail (there are a lot of tones, but the red hue gets too dirty),
- the pine tree releases pleasant and healing resins into the air, you don’t have to visit the pine forest, but just go to your favorite sauna in the house and take pleasure in spending time with your health.
What is the minus of the lining of a pair of pine lining? Resin pockets can expertly hide inside the wood and then suddenly come out. This means that a drop of hot resin can burn any part of the human body.Therefore, experts advise combining different types of lining - make benches from alder, and the frame from pine or linden.
Installation of shops and doors
Ideally, the ceiling height should be between 1.9-2.1 m, a higher level will not allow to avoid draft. The upper benches are best set higher, where the temperature conditions are the most optimal and healing.
Hinge a frosted glass door and enjoy the result.
[content-egg module = GdeSlon template = compare]
Do-it-yourself sauna in the house: Projects with Photos
A sauna in the house is a good option for those who do not want to engage in the construction of a separate building on the site for the bath, but want to be able to regularly bask in their own sauna. A compact and inexpensive built-in sauna will in this case be an excellent compromise and, subject to all the necessary conditions, can be installed absolutely safely in a house where people live permanently.
The main thing is proper ventilation
According to experienced masters, when arranging a built-in sauna with your own hands, the main thing is to provide for good ventilation. The following briefly illustrates how the proper ventilation should be in a home sauna.
Here the main condition is that the air should in no case go outside, but return back to the same room from which it entered the steam room. The air inlet is always made under the stove, and the outlet is on the opposite wall under the ceiling. Additionally, you can also make a ventilation hole under the shelf and use it instead of the ceiling. But the upper ventilation on the wall under the ceiling is provided in any case.
The door must be located on the same wall as the stove. This is very important, since if you place the door opposite the furnace, the streams of cold air entering through the doorway will collide with the hot air of the furnace and direct it to the wall, which will lead to dangerous overheating of its surface and can cause the overheating sensor to trigger.
DIY sauna project in the bathroom
This sauna was made in a fairly spacious bathroom. The overall dimensions of the steam room were 1240x980 mm, and the size of the bathroom - 3150x2950 mm.
The next photo shows the initial state of the bathroom, the installation of a sauna is planned in the right corner.
It is very important, before embarking on the manufacture of the structure, it is imperative to check where all the hidden communications of the room pass, where the work will be carried out. For wiring, for example, there are special devices for detecting hidden wiring.
DIY sauna installation technology starts with calculating the location of all the necessary elements. Then, the calculation and purchase of the necessary materials is carried out, after which you can begin to manufacture the steam room frame.
Metal perforated strips are fastened over the frame, which will become the main support for the basalt insulation layer.
The next stage is the installation of internal vapor barrier. For these purposes, a special foil vapor barrier on kraft paper is ideal. It is fixed on a wooden frame using a construction stapler, and all joints and places punched with brackets are sealed with foil tape.
During the installation of the insulation, it is necessary to provide ventilation holes, which are made from a piece of metal pipe wrapped in foil.
After the successful production of a layer of reliable vapor barrier, the steam room is sheathed with a wooden lining, which is fixed on a crate pre-fixed to the main frame.
Basement sauna project with photo of work stages
In a private house there was a free basement with dimensions of 5.1x4.9 m. It was decided to equip a sauna with dimensions of 2490x1630 mm and with a ceiling height of 2160 mm.
The basis of the design is a wooden frame mounted on bricks interlocked with heat-resistant glue.The sauna was originally planned, since on top of the wall you can see the finished ventilation hole.
Installation of all necessary layers of the steam room took place in the same order as in the previous example. After the construction of the wooden frame, it was outside sheathed with metal tapes, on which basalt thermal insulation plates were fixed.
After that, inside the walls with a construction stapler, a layer of foil vapor barrier is sewn - a special heat-reflecting film on kraft paper.
The space near the furnace is sheathed with glass magnesite plates for thermal protection of wooden surfaces from the heated body and stones of the stove.
On the vapor barrier installed crate for the installation of the finish interior.
An extract was made under the ceiling in a plastic box, which was then wrapped with basalt cardboard to insulate and prevent condensation from forming in it.
The cake of the walls from the inside out to the location of the furnace is as follows:
- Porcelain Tile
- Glass magnesite (LSU) 12 mm thick
- 6 mm basalt cardboard
- Mineral wool insulation plates in a wooden frame
- Layer of wind protection of the vapor passage membrane
- 10 mm ventilation gap
- Basalt cardboard 6 mm
- Another 5 mm ventilation gap
- Exterior finish with plastic panels
Where the furnace does not have a wall inside, the clapboard is installed on the crate, and under the crate there is a layer of foil vapor barrier. The remaining layers of the wall are repeated with the list above.
This is how the steam room looks from the inside with shelves and lamps installed in the corners of the walls.
The final stage after completing all work with wooden structures is the installation of an electric furnace. Here the choice also fell on a small stove for Harvia's sauna.
Finishing of sheets of glass magnesite is carried out with ceramic granite tiles on a special heat-resistant adhesive. In this design of the built-in sauna, ventilation is provided at the entrance through the ventilation holes in the glass door, and at the exit through the insulated duct in the ceiling, which leads into the hole in the wall.
[content-egg module = GdeSlon template = compare]
How to make a sauna in a private house with your own hands

How to make a sauna in the house with your own hands - this is the question that most summer residents and outdoor enthusiasts ask. Paired beneficial effect on the human body, cleansing it of toxins, as well as relieving fatigue. However, not everyone can afford the construction of a free-standing bath, due to the lack of land or financial opportunities. Therefore, recently, the construction of saunas right inside the house has gained great popularity. The visible advantages of this choice are versatility and compactness.
Planning and placing a sauna in a private house
Before you make a sauna in the house with your own hands, decide in which place it will be placed. Since the area of the steam room will depend on this.
Layout of a sauna in a private house
On a sheet of paper, make a sketch of your bathhouse, on which display the entire layout in the form of a drawing, while indicating the dimensions. Subsequently, during construction, this will help to avoid various mistakes. In addition, thanks to this plan, you can visually see your future steam room on the sketch, choose the right place for benches and stoves in it.
The most optimal layout of a sauna in a private house is a basement, but only if it is well ventilated and there is the possibility of summing up the necessary communications. This option is the most common, because it allows you to economically use a place in the house.
This article illustrates high-quality photos of saunas in the basement of a private house, thanks to which you can quickly choose the option for yourself. If you follow all the recommendations, you can even create a steam room with high quality and for a short period of time.
Before starting the construction of the bath, it is necessary to take into account the material of the walls of the house itself.The fact is that, for example, a sauna in a house made of aerated concrete will be an excellent solution, since the porous structure of this material has excellent vapor permeability. Thanks to which aerated concrete regulates the level of humidity in the room, creating the necessary healthy microclimate.
Construction of a sauna in the basement of a private house: working procedure
The sauna in the basement of a private house can be equipped provided that the selected room is dry and all the necessary communications are connected to it: sewage, water and electricity. In the event that a forced ventilation system is not installed in the basement, it will be necessary to organize it here.

Sauna in the basement of a private house
The dimensions of the sauna for the house are selected as follows: in the steam room for each person, it is necessary to provide from 2 to 3 m 3 of volume. After making calculations, choosing a project and a place for a home bath, you can proceed to its construction, which includes the following stages:
- arrangement of floors,
- installation of vertical frames,
- thermal insulation
- horizontal crate
- lining
- electric furnace equipment,
- installation of shops and doors,
- installation of lighting devices,
- Stoning stones
Floor in the sauna
The construction of the steam room begins with the device of the floor. The best option is to equip the sauna with a tiled and heated floor, which should be previously laid out before the erection of wooden structures. The tile can be of any quality, but it is desirable that it has a rough surface that prevents slipping. A more expensive option for arranging floors is natural and artificial stone.
Frame in the sauna
A sauna in the basement of a private house with its own hands should have a reliable and solid construction. To do this, you must follow the rules for installing vertical frames:
- A glassine is laid on brick or aerated concrete walls, which is necessary for vapor barrier. It has a large water-repellent effect and provides waterproofing to the coating. You can replace glassine with bitumen paper, which has similar characteristics, but its base is much lighter, and the material is thinner,
- glassine must be lapped on the wall with ordinary slats,
- on the walls, you need to install vertical frames with the help of bars 50x50 mm or 40x60 mm,
- the next one is the ceiling frame, during the formation of which it is necessary to lay, and subsequently equip, ventilation, electricity and fire safety systems,
- to ensure fire safety, a dry pipe is installed around the perimeter of the cabin, in which holes are drilled at a certain angle and in case of fire, water will be sprayed around the cabin, which will allow localizing the fire.
Thermal insulation
The construction of a sauna in a private house should include mandatory installation of insulation. Why it is necessary to use mineral wool on a basalt basis.
The second stage of thermal insulation is the laying of aluminum foil, since it is able to maximally preserve the entire spectrum of thermal radiation indoors, creating the effect of a thermos. Fixation of the foil is carried out using a special adhesive tape.
Horizontal lathing and cladding
Prior to lining, the construction of a sauna in a private house includes a horizontal crate. For this, bars with a pitch of 400 mm and a section of 30x40 mm are used, which must be set strictly in level, and their transverse frames are fixed with a section of 30x60 mm, with the aim of further fixing the shelves to them. This will attach the sunbeds not to the lining, but to the frame.
Lathing and lining of the lining of the sauna
At the next stage, a sauna in a private house is sheathed with a lining board, including all walls and ceiling. Before starting these works in the ceiling, a ventilation valve is equipped above the stove in order to ensure the flow of cold air.A valve with a diameter of up to 150 mm is installed on it, allowing you to control the temperature regime in the steam room.
For cladding lining, you can use such wood species as:
- linden - has a pleasant aroma and has a beneficial effect on the human respiratory system,
- alder - has low thermal conductivity,
- pine - rich in phytoncide resins.
Installation and assembly of electric furnaces
An electric sauna oven with your own hands can be made not even by a professional electrician, but its connection is better to entrust to a specialist. Self-assembly of a sauna heater includes:
- drawing up a schematic drawing of the device,
- calculation of the number of heating elements, taking into account the required power,
- furnace assembly - heating elements must be fixed on the frame and connected with jumpers. As a basis, it is recommended to use a steel sheet with a thickness of 3 mm, to which the remaining elements are fastened with bolts and welding,
- installation of the furnace in the sauna,
- laying stones in the finished frame,
- installation of a protective casing of steel sheet,
- connecting the sauna heater using a series or parallel connection of heating elements,
- Checking the health of the device.
Installation of shelves and doors
The upper shelves in the steam room are made as high as possible to provide the best effect for soaring. But, the distance from the bench to the ceiling should be at least 1 m, and the height of the lower sunbed can be 65 cm.

Installation of shelves in the sauna
The doors to the home bath are best installed glazed to discharge the tension of the enclosed space of the room. In addition, the sauna demonstrated in this article in the photo in the basement of a private house with glass doors proves how laconic this design looks.
The next stage is the installation of lighting fixtures and decorative fittings.
Stone laying
It is necessary not only to think about how to make a sauna in a private house, but also not to forget about ensuring the comfort of staying in it. So, the correct laying of stones, on which the healing properties of the sauna depend, plays an important role in this. Therefore, smooth round stones of different sizes are best suited for an electric sauna heater, since they facilitate air circulation. Large stones are laid out at the bottom of the heater, and small stones at the top.
Compliance with all the rules for building a sauna in the basement of a private house will allow you to create a convenient, beautiful, and most importantly - comfortable room in which you can spend time with loved ones for health.
[content-egg module = GdeSlon template = compare]
How to make a sauna in the house with your own hands
For those who like to take a steam bath in the bathhouse, it probably came to mind: “Can I make such a house myself?” In fact, building a sauna at home is not a bad option, but to do everything correctly and mutually, you need to think carefully about everything. In the article you will learn how to make a sauna in the house with your own hands and what is necessary for this, because you must agree that it is important to think through all the details.
Building materials and everything you need
To start, it’s worth considering and deciding what materials you need to build a sauna, and how you will lay the walls and foundation. Usually, a sauna is equipped with a brick or a tree, it all depends on your choice. Some want to build not just a sauna, but a pool in it. The idea is very interesting, especially to those who live in the private sector. If you do not have the skill and experience in building stone, then all the same it is worth considering the option of a village. The ceiling and walls are laid over it, but it is recommended that concrete be laid around the foundation.
Costs and construction costs
If you need a home sauna with your own hands, then you should definitely decide on the costs that will be spent on its construction and resolution.You can independently build not just a sauna, but a real recreation center, the main desire and interest, and of course money! In general, the cost and materials depend on what kind of room in width and volume. For example, a 4x4 meter sauna can cost about 10-11 thousand dollars. But to build penates for 6 meters, you will spend about 20 thousand dollars. Sauna or bath - a pleasant pleasure, but a little expensive. But still, if you try, it is possible to invest in 7 thousand dollars.
Savings on building materials and construction in general
It is these factors and, so to say, elements that influence the cost of building a sauna:
- A type of material for wall treatment, i.e. a beam or log.
- Type of log and beam, that is, they are rounded, profile or glued.
- The area and size of the bath, as well as the number of visitors and volume as a whole.
- Labor and building assistance. Of course, you can do the construction yourself, however, if you do not have experience working with building materials, it is better to hire workers and spend about 400-500 dollars.
- It is worth considering and calculating the time for building a sauna, but it depends on whether you build it yourself or with the help of labor. If you hire workers, then you will save time and at the same time speed up the construction process, of course by paying them with money.
Do I need to draw up documents?

Before starting the construction process, you need to consider and resolve the issue of documents and turn to lawyers for help. If you believe article 51 of the Russian Federation, then no documents are required to build a bath in its own territory. If they tell you otherwise, then you should know that they are not familiar with the Constitution of the Russian Federation or scammers, be careful and calmly build a sauna without any fears or fears!
Sauna Placement
You want to build a bath, but the question arises, where to build it and what place will be suitable? Before you start building, decide where you will build. The place needs to be selected, paying attention to such factors and grounds:
- The place to build a bath should be far from wells and wells, because it will be difficult. Also, the site should not have residential buildings within a radius of 20-25 meters.
- A place with a bathhouse should not cause inconvenience and trouble to neighbors, therefore, put away the sauna by about 2.5 meters, otherwise there may be problems and unpleasant questions from the residents.
- The place for the construction of the bath should be on the surface, because there will be no problems with the construction and also, you can easily conduct water. It is also recommended to install doors from the south, but windows from the west, so you can maintain a normal room temperature.
DIY sauna in the house: projects, photos
Before you begin construction and purchase building materials, you need to draw up a plan and at the same time consider photo projects.
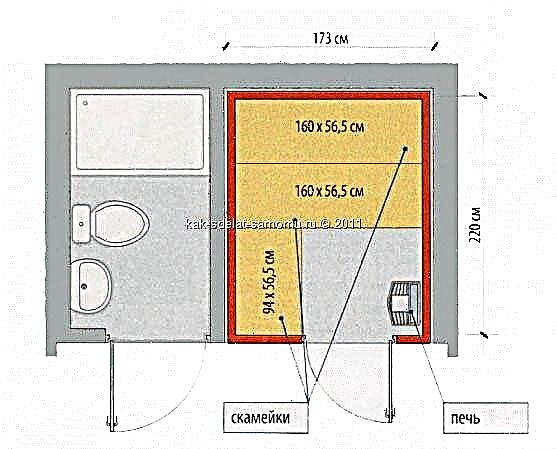
A common room size is 4x4 meters, that is, this is the most optimal option. If you have decided on this size, then you need: your own steam room 2x1.7 meters, compartments for washing 2x2 meters and a dressing room, which is 1.7x3.7 meters.
DIY sauna in the house and the choice of stove

Pay attention to this question. Without a stove, the sauna will not be able to move forward, you can set it up, however, you need to decide what it will be, and most importantly where. Types of furnaces distinguish such:
- Kamenka on gas.
- Electric ovens.
- Classic made of bricks.
Those who love a real Russian bathhouse probably know that you cannot just buy a stove in a store, you can only build it yourself with brick. It is only necessary to build it in place, it is almost impossible to move it in another way, be sure. The weight is incomparably large, almost 1000 kilograms, therefore, the plain must be concrete in order to maintain such a volume.
If you melt the bath, then by itself, the temperature will be up to 500-600 degrees, but keep in mind that this will not affect the temperature of the sauna itself. As you know, just such a steam is capable of delivering pleasant sensations and a healing effect, so to speak.
Nowadays, a huge selection of acquiring highly developed technologies for the construction and installation of a stone furnace is provided. Due to this, the stones heat up and heat, as a rule, is stably maintained. Also, not too much time will be required for heating the sauna room. The heating process will take about 4 hours, provided that you have all the necessary materials, however, in a normal process, this takes from 7-8 hours. Of course, the temperature of the walls will vary significantly from 40 to 60 degrees, but heat will be released from the stove, which can warm the room. The air will not burn out and evaporate in the sauna, that is, it will breathe easily and without any difficulties.
But pay attention to the fact that there are some corrections and nuances. The stone stove has its drawbacks. The most important thing is that it cannot be built without the help of specialists and craftsmen. If you were able to build a sauna yourself, then you are unlikely to succeed without the help of experienced professionals and specialists who accurately understand their work and have experience from it, and this is a lot of importance. Of course, it is impossible for you to build it yourself, therefore, you will have to use labor, this will take additional costs, but then you can enjoy the process, which is worth it!
Where is it better to place the firebox?
A brick stove works strictly on wood, therefore, you need to think carefully about where the special firebox will be located. It is available for installation, both indoors with a stove, and in another, therefore, there is a choice. Most people choose the option in the next room, that is, far from the steam room itself. Of course, it is not so easy to carry the furnace into the next room, but believe me, it is worth it, due to its convenience. The door for the furnace can be built of glass objects and designed as a fireplace, it will be very beautiful. You can enjoy the warmth, pleasant sensations and also beauty, because it will look very chic!
Electric oven analogues

Such a furnace is often controlled by a control unit, or by a remote control, although this is in rare cases. Thanks to this function, you can choose a temperature and time suitable for you at any distance, then enjoy the process. Also, the automatic shutdown function is available, that is, the temperature can be adjusted according to the rhythm and time you set, and this is one of the advantages of such a stove.
Also, for such a stove you do not need a chimney, and this saves time, money and of course the cost of construction as a whole. The cost of such pleasure can be different, it depends on the model and manufacturer, but usually, the average cost is 5-6 thousand Russian rubles. But do not forget that you need to clarify the power and strength of the stove, whether it is able to warm the room completely. Such a function is more designed for an area of 1 meter squared, and it requires 1-2 kW of power generation. If the bathhouse is 4x4 in size, then a lot of power is needed here, about 15-16 kW. Of course, it can cost a lot, but it's worth it.
Progress and improvements!
In some models of such furnaces, a special pair generator is already built in, of course, the cost depends on this. Due to this, in the room you can safely adjust the temperature and humidity in the air, and this is only a plus to such an apparatus. If you take a heater or brick, then this option is not available, this is a minus!
Gas Devices

As you know, such plates are used most often. They work due to bottled gas or energy.The advantage and advantage of the apparatus is that it consumes less gas and there is no need to harvest firewood, and this, by the way, is a lot of importance for the time spent. After all, if you compare with other devices, then such a function is not available to them.
There is another optimal option - this is the purchase and installation of a combination furnace. This device is able to operate on various fuels, more specifically on gas and wood, that is, you are given a choice. But pay attention to the cost, it is 20-30 times more than conventional gas furnaces.
Room allocation and room department

The separation of rooms and premises is an important issue of design and interior design, which try to be treated no less carefully. Such a process is often performed according to such criteria.
First pay attention to the floor. For a real Russian bathhouse, it is customary to use a wooden coating, especially with timber. Just keep in mind that every time you relax in the sauna, the floor covered with wood will absorb all moisture, and this will affect its quality. If this problem is not eliminated, then over time the floor will rot and an unpleasant odor will form. To avoid this problem, it will be safer to use ceramic tiles, it does not absorb moisture in itself and will give a design to your sauna. At the same time, it is immediately covered with a concrete surface. To prevent the accumulation of unnecessary moisture in the sauna and the temperature to be normal, it is necessary to stabilize the slope towards the pit by 1: 1000 meters. In this case, your bath will not accumulate moisture and there will be no puddles and water on the floor. But at the expense of walls and ceilings, they can be equipped without any doubt with a tree, or timber. They, unlike the foundation, do not have the ability to absorb moisture, cause fungus and rot, and this, by the way, is very convenient and effective.
So it turned out how you can make a sauna quickly and not expensive on your own. Experts recommend starting construction during the warming seasons, that is, in the spring or summer, in order to save time and at the same time enjoy the process much longer. Therefore, try to think and calculate everything as much as possible in order to prevent serious mistakes. Also, note that having built a sauna, you can enjoy the process of soaring at any time, moreover, it is very good for your health and delivers a lot of pleasant sensations.
[content-egg module = GdeSlon template = compare]
Do-it-yourself shield bath step by step instructions

The main advantages of such baths are the following characteristics:
- shrinkage of the bath is minimal, because the building is light,
- minimum budget for finishing materials, compared with the construction of other types of baths,
- do-it-yourself panel bath is a laborious process for which you do not need to be an experienced joiner,
- heating of this type of bath is quick,
- any kind of finish both outside and inside,
- durable use.
A significant drawback of the frame-panel construction of the bathhouse is its non-solidity. The box is stitched with the help of separate panels, the joints between which need to be closed up with something.
In this case, insulation with mineral wool or other similar material and waterproofing, for example, using aluminum foil, will help.
But one drawback will not spoil the excellent combination of price and building speed of the frame-shield bath.
The construction project should be chosen standard, without complex bends of the walls, as for example in the photo.
Typical drawings of a small bath include: steam room, sink and relaxation room.
Step-by-step instructions for the construction of a frame-shield bath
Step 1. First decide and purchase all the necessary materials, namely:
- for the foundation - piles or components of concrete mortar (sand, crushed stone fraction 20 * 40, cement), followed by primer treatment,
- for the frame - timber 12 * 12 cm, board 15 * 3 cm, bars 7.5 * 4 cm,
- for internal and external decoration - lining, cement-bonded particle boards (DSP), OSB or siding,
- for thermal insulation - mineral wool or basalt plate,
- for waterproofing - roofing material in two layers,
- for fixing the material - nails, screws, metal angles, etc.,
- for roofing - metal tiles or euroruberoid, a complaint and accessories for the removal of rainwater from the bath.
Step 2. Getting to the foundation work. Since the design of the bath will turn out easy, the most optimal version of the foundation is pile, which will save effort and money. To make the foundation stronger, lay the tape after installing the pile foundation. This is a prerequisite for the foundation of different types of soils.
The first base beam is attracted (screwed) to the foundation by any existing anchor methods. After checking the level, roofing material is laid on top of the timber.
Step 3. An important step in mounting the frame is to calculate the number of vertical posts. If the bath is small (no partitions), then the racks are only in the corners.
The minimum distance of the racks is 60 cm, and in the course of work, you should constantly check the strictly vertical installation of the racks to prevent skewing.
This will help tools such as the construction level and plumb, and the use of struts for racks will reliably fix the position of the rack.
Warming of the walls of the frame-shield construction of the bath is simply necessary, as well as protection from moisture, therefore, we carry out heat and waterproofing.
Step 4. Installation of the roof, which is most often gable, also requires insulation, waterproofing and the construction of the ceiling.
The attic room in the frame-panel bath should be discarded, the lightweight structure may not withstand the extra load. The following is a section of the roof of the bath.
Step 5. Installation of partitions and flooring, which depends on the type of foundation. A preferred floor arrangement is to plank boards at a slight angle to drain water into the sewer.
Step 6. Final work on the installation of doors and windows.
Step 7. Facing the walls of the bath with decorative materials. Inside, there may be a lining fixed with nails or staples. Outside, the bath is sheathed with different finishes:
- TsSP (1.25 m) - non-combustible, durable and waterproof plates,
- OSB (1.22 m) - with this size, the plate clearly becomes between the vertical racks of the frame and does not need to be trimmed. OSB does not require additional finishing, since the plate is smoothly sanded.
The difference between the two plates is also the availability of fixing tools. To work with TsSP plates you will need a grinder, and in the material you will still need to drill a hole. Installation of OSB is closer to carpentry.
To create a more attractive appearance of the bath, sheathe it with ondulin or a galvanized sheet profile.
DIY frame bath: step by step instructions
To get started, let's figure out how to build a foundation for a frame bath.
If you stayed on a columnar foundation and are not going to fill the grillage, then the lower harness should be made thicker from the timber (up to 200 mm).
Such a structure as a bath, of course, requires a drain. Doing it yourself is also not difficult to arrange. Even before pouring the foundation, you should dig a trench under the pipe and the well receiver. A concrete base under the floor is poured with a slope to the place of its exit (where they dig a small receiver-tray for water).
When pouring, the floor can be additionally insulated. To do this, the soil is first compacted (withstanding the slope), laid in a trench pipe and filled with it. 20 cm of crushed stone is poured on top and a concrete screed of 3 cm is poured. You can see more details about the device for draining the bath here.
Tip: When arranging a concrete base under the floor, do not forget to leave a place under the foundation of the heater.
Then expanded clay is poured onto the screed. Waterproofing is laid on top of it. Then, everyone pours concrete with a layer of 5 cm with reinforcement of the entire structure, a chain link.
Wall and roof frame assembly
The lower harness is attached to the foundation posts with anchor bolts with hex nuts and wide washers (for more details on installing the lower harness see here). For each pillar, depending on the distance between them, 1-2 bolts are used. At the next stage, corner posts are installed.
Mount them on steel corners. Next, proceed with the installation of intermediate racks. The step between them is usually 0.6m. Then fasten the upper harness and permanent jibs on the inside of the bath (four for each rack). You can see step-by-step instructions on the construction of frame walls here.
At the next stage, the floor beams are fixed to the upper trim with corners or a notch. Next, the rafters are installed on the anchor with additional fastening with brackets.
Wall insulation of the frame bath
When building a frame bath, attention should be paid, including wall insulation. This operation is performed in several stages:
- Fiberglass plates are installed between the racks.
- On the racks, a waterproofing film is fixed with bars.
- A blockhouse is attached to the bars.
- From the inside of the bath, a vapor insulator is also mounted on racks with cubes.
- The inner lining is done with a board or clapboard.
Important: The board used for interior cladding must not be painted. Lacquered lining is not allowed.
Before warming the walls, you need to insulate the roof. To do this, the waterproofing film is first stretched on the rafters. Fix it with a slight sag. Then the crate is stuffed and the roofing material is mounted.
The ceiling of the frame bath is insulated in much the same way as the walls. Here is the exact step-by-step instruction:
- 1. A vapor isolator is mounted on the beams.
- 2. Sheathe the ceiling with a lining or board.
- 3. A heat insulator is placed on top.
- 4. Sew the floor of the attic.
At the final stage, the concrete floor of the bath is tiled. Next, they mount windows and doors. At this, the construction of the bath is considered completed. You can start the construction of a heater, assembly shops, etc.
on the topic "construction of a frame bath do-it-yourself":
Features of the construction of a shield bath
Owners of suburban areas often think about building a bathhouse, where you can take water procedures, relieve fatigue, and take a steam bath with a broom. And they are looking for the least expensive option in terms of finance, labor and time.
In this case, it is worth paying attention to the frame-shield bath. For its construction, you will spend 1.5, or even two times less wood material than using logs or timber.
And the process of performing the work itself is simpler and allows you to take up the work yourself even for those who do not have extensive experience in conducting construction and installation works.
Do-it-yourself shield bath: step-by-step instructions
The design of the shield bath is lightweight, so its arrangement does not require the construction of a solid foundation, you can restrict yourself to columnar and use asbestos-cement pipes, fill them with concrete or apply reinforced concrete columns. If desired, developers equip a shallow tape base. Regardless of the choice of type of foundation, work begins with the heading of the site, for this:
- Level the site for construction and think over the water drainage system. For a small bath, which few people use, they usually organize a drain into the ditch.
- Armed with pegs and a cord, they mark the foundation around the entire perimeter of the structure.
- They begin laying the pile foundation by digging pipes to a depth of 1.2–1.5 and aligning their part protruding above the surface to the same height. The pipes are concreted, after the mixture has hardened, they are waterproofed, covered with roofing material so that the wooden elements of the future design do not come into contact with the jam. Allow concrete to gain strength.
- Before starting work on the construction of the frame and walls, check the evenness of the surface of the foundation in a horizontal plane.Having found deviations exceeding 1 cm, they are eliminated using an additional layer of the solution.
- Lay the basement of the frame. For this, a beam of coniferous wood (the minimum permissible cross section is 20x25 cm) or boards of size 5x10, which are pre-treated with an antiseptic composition designed specifically for baths, are suitable. The corners are joined using the “paw” or “half-tree” methods. After checking the accuracy of connecting the corners, which should be 90 degrees and the horizontal laying of the basement beam, fasten the harness to the foundation posts (with screws or anchors). For structural stability, each anchor is deepened into the foundation body by at least 10 cm.
- Install the vertical support racks of the frame. Their location is mandatory in the corners of the building and in places where the owners intend to make internal partitions. So that they have a strictly vertical direction, the racks are strengthened by constructing temporary supports during the assembly of the frame. Depending on the size of the bath, the required number of intermediate racks is calculated, the recommended step is 0.5 m. In places where window and door openings are located, this distance is 1 meter. In order for the structure to gain maximum stability, additional jibs are installed that support each vertical support.
- Stack the elements of the upper strapping, fastening with racks. Fasten using the cutting method or using steel corners.
- The next stage in the construction of a shield bath with your own hands is the installation of ceiling beams, on which the truss elements of the gable roof farm rest. The design of the skeleton of the roof depends on the chosen roofing material and its weight. It is advisable to lay light material, since the base and supporting structures of the structure are not designed for heavy weight. Therefore, the roof is usually made of iron or rolled materials.
- Carry out the outer skin, for which they use: boards, plywood, OSB-boards. Joints at the joints are caulked or blown with foam. Finishing of wall structures is carried out by a block house, siding and other materials to the taste of the builder.
- Next, proceed to the interior decoration of the bathhouse. The best option for the steam room are wooden boards or lining made of aspen, linden or alder, since hardwoods have low thermal conductivity. Less commonly, cheaper pine wood material is used. For the dressing room and rest room, plating with plasterboard or plywood is suitable. So that the bath does not cool down quickly, a layer of insulation is laid, which is covered with a vapor barrier on both sides, so that condensate moisture does not accumulate in it. You can use mineral wool, arbolit and other heaters. Mount the insulation layer simultaneously with the fastening of the skin.
On this, the main work on the construction of a frame-panel bathhouse with your own hands comes to the finish, there remains a crucial moment - to put the stove and do the flooring.
You can significantly simplify and speed up the construction process by using the ready-made sets of panel baths that the construction market offers. They are assembled like a designer, spending a few days. Acting clearly according to the instructions, which describe step by step how to build a prefabricated switchboard bathhouse, it is easy to build it yourself without any experience or relevant skills.
Advantages and disadvantages of the shield structure of the bath
Before finally deciding on the intention to build a frame-shield bath, each potential developer wants to weigh the pros and cons, having familiarized himself with its advantages and studied the disadvantages.
The advantages of the structure include:
- insignificant labor costs and simplicity of construction,
- small financial investments,
- the ability to use the bath immediately after construction, since the structure is light and does not require a long period of time for shrinkage,
- Thanks to the sheathing with wood material and the insulation layer, the room quickly warms up and retains heat for a long time.
The disadvantage of a shield bath is a short operational period, which experts voiced at 15 years old, and the need for enhanced thermal insulation.
Sources: //banyagid.com/stroitelstvo/banja-shhitovaja-svoimi-rukami.html, //postroju-dom.ru/banya/52-karkasnaya-banya-svoimi-rukami, //stroikadialog.ru/articles/bani/ osobennosti-stroitelstva-shitovoi-bani
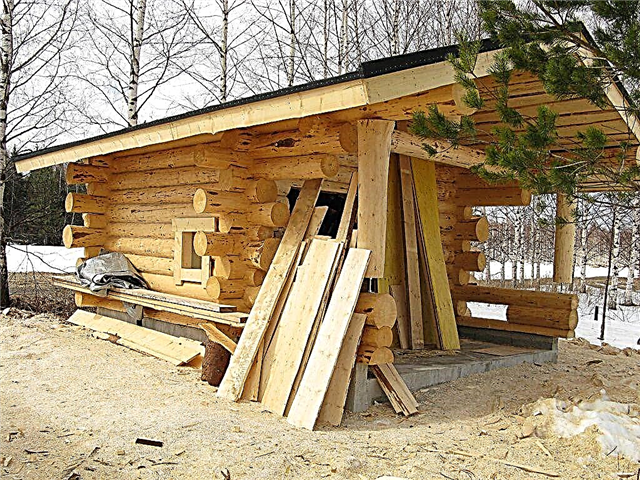
Built-in sauna in the apartment: a step-by-step master class with photos
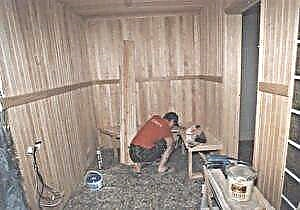
In the process of building the house, I had the idea to equip a sauna in it - I really wanted to have my own bathhouse “at hand”. At the bottom of the house is a brick basement floor, just there the built-in sauna will be very welcome. Places with a shaft, and the ceilings as much as 3 m.
After several weeks of thinking and studying the literature, I decided to take a desperate step and ... built a sauna on my own! The work was carried out for 1.5 months, exclusively on weekends, we can say without tension.
Now, based on the experience gained, I will try to describe in detail the progress of this construction.
First of all, I made a plan for the frame and the placement of all the elements. The size of the sauna in the plan is 1960x2800 mm, height - 2100 mm. The whole structure, which is a wooden frame with a warming pie, is built into a small room on the ground floor.
Here, it’s probably worth clarifying what an “introduction” into an existing brick or other room is, is not a mandatory moment. Very often saunas, especially with unusual angular or rounded shapes, are adjacent to the main walls with only 1-2 sides.
In general, you need to choose a location depending on existing realities.
Sauna furnishings: 2 shelves with a retractable bench and an electric sauna heater with a control panel, designed to load 90 kg of stones.
I calculated and drew all this on paper, and then began construction.
Step 1. Formation of the floor
I began with the fact that along the perimeter of the existing room I laid out a side of bricks installed on the edge. The floor, in the educated interior space, was faced with ceramic granite tiles. He fixed the same tile on the inner walls of the brick walls. As a result, a kind of waterproofing pallet with walls to the height of a brick formed on the floor.
Plum did not. I decided that there would be no puddles on the floor of the sauna and I didn’t take any extra body movements on this occasion. Unless the water will be poured over the heater, but in small portions, no one is intentionally splashing on the floor.
"Pallet" for the future sauna
Step 2. Mounting the frame
I decided to close the wall behind the stove-heater with a facing brick, without any cladding and lining. At the bottom of this wall is a ventilation hole for supplying air to the furnace from an adjacent shower compartment. The remaining surfaces of the sauna (walls and ceiling) will be formed by the frame.
At the bottom of the wall there is a hole for air flow from the shower
I fixed the frame to the brick walls, knocked it together from 100x50 mm racks and 50x50 mm crossbars. The thickness of the bars of 50 mm is not random, it is the minimum that will provide sufficient ventilation clearance to ventilate the insulation and prevent condensation.
The slats of the frame were set as evenly as possible using the laser level
At the stage of forming the frame, ventilation hoods are mounted. One is under the shelf (open during bath procedures), the second is under the ceiling (opens after steaming, for accelerated ventilation).
Both hoods are installed in one channel from a galvanized pipe of 110 mm. The channel will go above the ceiling, the exit - to the shower room, where air is taken for inlet. That is, where the air comes from (from the shower through the hole in the wall), it returns there (to the shower, through the hood). Natural ventilation in action!
Ventilation duct mount
The lighting was wired, the power cable for the sauna heater was mounted.
Step 3. Covering the frame with a membrane
On the bars of the frame, I found a windproof membrane. For fixing I used a furniture stapler. Sheets fastened tightly, without sagging, even with a slight tightness.
In this case, the membrane performs the following functions: fixes the position of the insulation in the cake, does not allow moisture to get outside into the insulation.In addition, the membrane “breathes”, that is, it is not a barrier to air, the insulation under it is freely ventilated. A vapor barrier film should not be used instead of a membrane.
Step 4. Stuffing rails and laying insulation
On top of the existing frame, I filled the rails, their step is equal to the step of the insulation used, I have 50 cm. I fixed the embedded bars on which the frames of the regiments and backs will be held.
Membrane and top-mounted slats between which mineral wool sheets will be inserted
Then between the slats laid mineral wool sheets, 100 mm thick. It is necessary to lay it, after squeezing the insulation a little. Then the sheet will be taken by surprise, without gaps.
On the ceiling of the insulation is 2 times more - the thickness is 200 mm, yet the biggest heat loss just goes through the ceiling, it is necessary to block them.
Mineral wool is installed between the slats.
Step 5. Foil lining
Further - I filled the foil on the slats, took a dense, 100 microns thick. Used a stapler, after which each stapler bracket was sealed with aluminum tape. Taped all the joints, cracks, wiring leads and ventilation duct.
Foil, in addition to vapor barrier properties, plays the role of a reflector of infrared thermal rays. That is, together with the main heat insulator (mineral wool) it saves the heat coming from the heater.
Foil mounted on the ceiling and walls of the sauna
Step 6. Installation of the lathing and lining
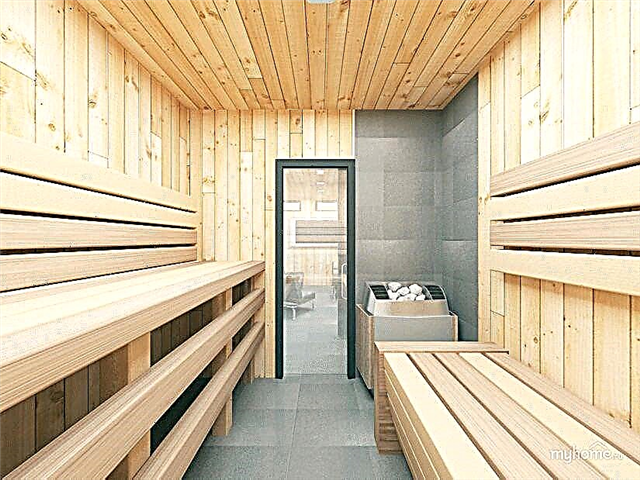
To organize the ventilation gap, on top of the foil, I filled the battens of a battens with a thickness of 20 mm.
Lathing for lining drilled over the frame
Then - lining. I was lucky to get a lining of excellent quality - all planks are even, clean, dry. Grade A, linden.
I began to fasten the lining from the ceiling, moving from the corner from left to right. Fastening elements - self-tapping screws. I screwed two 3x30 mm screws into the front of the plank from above and below (then they will overlap with a plinth), two more 2.5x25 mm screws into the grooves of the plank.
Cladding for ceiling
Having finished with the ceiling in about an hour, I went to the walls. I decided to orient the lining vertically, so I like it more. I chose a corner and began to sew from it.
I had to work with a pair of compasses and a jigsaw to cut holes for the output of wires, a temperature sensor, and ventilation. So the walls were sheathed longer than the ceiling. But, most importantly, start.
And then work argues and you don’t notice the time.
When fixing the lining, each bar is controlled by the level
Top self-tapping screws overlap ceiling skirting
Step 7. Construction of regiments and shops
According to the design, in the sauna there will be 2 shelves installed in the form of the letter G. Along the long shelf is a retractable bench.
I fixed the frames of the regiments knocked down from a 100x50 mm timber to the wall embedded slats. Corner joints reinforced with metal corners.
It seems that the strong construction turned out, I sat on it and jumped - held on, not moving. But still I decided to play it safe and secured a few props from the bars.
He put each “foot” on rubber pads. After which the design became motionless and completely monolithic.
The frame is drilled to the mortgage screws 6x150 mm
Next is the bench frame, made of 100x50 mm timber using the same technology as the shelf frame.
The design of the bench allows you to push it under the shelves during cleaning
The casing of the frame from above was made of boards 90x25 mm, the gap between them was 7 mm. Each board had to be tried on and trimmed at the end face 2-3 times to observe millimeters of clearance. I wanted everything to turn out smoothly and to please the eye. I’m doing it for myself!
The lateral planes of the shelves, for a more interesting design and economy, I already made up not only of 90x25 mm rails. I have 2 of them on each sidewall, and in the center there are 4 narrow slats of 45x16 mm.
Shelves can not do without gaps, they provide good ventilation of wooden planks
The retractable bench was sheathed according to the same principle.It’s more convenient with her, I took her out of the sauna and already sheathed it. And then he brought it into place.
On the pre-screwed to the frame mortgage bars I hung the backs of the shelves - horizontal slats remaining from the casing. Between the slats left a gap of 8 mm.
And, at the end of the process, all wood furnishings - shelves, bench, backs - were covered with 3 layers of Tikkurila oil.
Step 8. Assembling the fence and installing the furnace
He began to design a fence for the stove - in the form of a metal semicircular frame, sheathed with wooden slats. The diameter of the sauna heater is 430 mm, its height is 1100 mm. There should be a gap between the rails of the fence and the stove, I withstood 85 mm. Thus, the diameter of the fence was 600 mm.
For the fence, I used a piece of 4 mm thick stainless steel sheet. I gave it to a friend with a plasma cutter, he cut the sheet into even strips, 30 mm wide. And then on the rollers bent three strips to the desired diameters. 4 more strips remained flat. Then all this was welded into one structure, which is planned to be fixed to the wall with wing nuts.
Fencing frame tightly welded with electrodes
The fencing frame was sutured with 45x16 mm battens, there were just a few of them left after finishing the shelves. On the front part are additionally attached 2 legs-supports made of 90x25 mm rails mounted on rubber gaskets.
The fence is lined with diverse rails - it looks interesting
Next - the heater is put in an approved place near the wall, connected to the power cable. The cable, by the way, comes out of the supply ventilation hole, which is located at the bottom of the wall. It turned out very convenient, I did not have to drill additional holes.
It was decided not to fix the oven to the floor. It itself is heavy plus will be filled with 90 kg of stones. You won’t go anywhere - if you want, you won’t move.
The fence is fastened to the wall (wing nuts). It is worth it!
The guard is tightly screwed to the wall with stainless steel nuts
The time has come to lay stones, for this I bought 100 kg of dunite in advance. He washed the stones with water, under pressure, sorted by size. He laid it carefully in the oven, trying not to wedge the tena.
I picked it in size and put it in the oven basket. He laid the largest downstairs, then the middle ones, and the little thing on top. Surprisingly, 100 kg came in (although the kiln is designed for 90 kg), even the peas did not work from above.
I had to buy more, for picturesqueness.
Stones loaded in the basket
From above, above the heater, I set up a metal screen, inserting it into the seam on the brickwork of the wall.
The metal screen reflects heat rays from the wooden surface of the ceiling
Step 9. Installing the door
I got to the front door. I ordered it at the local woodworking industry, received - size to size. The design is the simplest, but made firmly. Of linden, like all the wooden components of my sauna. I put it in the aperture, hung it on two butterfly loops, laid a seal around the edge of the junction.
Sewed slopes lining vertically. I saw a lot of pictures where slopes are sewn, usually with horizontal slats. But I don’t like it so much, I decided to make slopes, as a continuation of the general skin of the sauna. And there I have a lining oriented vertically, so on the slopes as well. He set the door and even sawed out a small ornament for more interesting design.
A door latch is used to secure the door.
This is how my sauna looks from the front door
This is where my story ends. In general, for 1.5 months of work on weekends, I got a beautiful and functional sauna, which is not ashamed to brag to acquaintances and friends. The bathhouse quickly warms up, while the air remains fresh even at high temperatures, after the procedures lightness appears throughout the body. I think that I am my "tech. task "coped!
How to build a home sauna with your own hands
A home sauna has many advantages. In addition to the pleasure and benefits of water procedures, the owner of the steam room enjoys special honor among friends and relatives. Simply put, having a home sauna is fashionable today.
It can be dry or wet, like a bath. In a dry sauna, the air warms up to 70-120 ° C and has a humidity in the range of 5-20%, and in a damp room, the temperature does not exceed 50-70 ° C with a humidity of about 90-100%.
Photo of a home sauna
Choosing the right place
Before making a sauna in an apartment or in a house, it is necessary to determine where it will be located. Lucky for those whose bathroom is comparable in size to a normal room. A spacious bathroom can also serve as a sauna. If the size of the room does not allow you to "turn around", you have to do a sauna in another place.
A sauna in a private house with your own hands can be built in any suitable building.
The main requirement is that there it is possible to equip efficient ventilation, conduct wiring and lay the tiled floor.
If there is no ready-made room, we build a sauna, starting with the foundation, walls and roof, and then proceed to the following paragraphs of the instructions. Here the option of equipping a steam room in an existing room is considered.
Choosing a variety of saunas
When building a sauna with your own hands, the calculation of the project must be carried out taking into account the fact that for each person there must be at least 1 square meter. m of area (or 2.5-3 cubic meters of space). The degree of humidity should also be considered. There are several types of steam rooms that differ in thermal and humidity characteristics:
- Turkish, in which very high humidity and moderate temperature are kept,
- Finnish, where the steam is rather dry and the air warms up above 100 ° C,
- Russian, equipped with a brick oven, with high temperature and wet steam.
Finnish is considered the most useful sauna and it is recommended by experienced craftsmen for the construction.
Floor device
No matter how you would like to make a wood floor in the steam room, you should not do this. The optimal solution for the steam room is a heated floor covered with tiles. For its construction, you will have to remove the old coating, if any, then lay the cable heating elements on the underfloor heating and fill in the screed. The last stage is the laying of a tile that matches the pattern.
Tiled floor in the waiting room
Installation of a vertical frame
The crate is made of battens, and before that they arrange vapor barrier. As a vapor barrier, bitumen paper or glassine is used. If the walls of the apartment are brick, they must be insulated with a glassine. The vapor barrier material is attached with an overlap of 15 cm. For strength, use slats, nailing them with small studs or attaching with a stapler.
The frame is made of 5x5 cm bars, installing them vertically around the perimeter of the walls. In the corners of the cabin and on the ceiling, bars are also strengthened. The step between the elements of the frame is chosen, focusing on the dimensions of the heat-insulating plates: the gap between adjacent bars should be several centimeters less than the thickness of the plate so that the insulation lies tightly.
Openings for wiring and ventilation should be provided in the frame. A dry pipe is laid in the hole and pulled along the entire perimeter of the steam room. Pipes must also be laid over the ceiling of the sauna. Given that the ceiling height is about 210 cm, there should be enough space.
In case of fire, fit pipes with holes where water will come from. There should be two ventilation ducts: supply and exhaust. It is considered normal if there is a sixfold exchange of air per hour. In ventilation, it is necessary to make a valve so that in case of fire, hot air does not enter other rooms.
Insulation of the ceiling and walls
Between the bars of the frame, it is necessary to lay a heater.You can take the cheapest material - mineral wool. Despite its low cost, basalt-based mineral wool is characterized by high heat-insulating ability. First, the walls are insulated, and the ceiling is closed with insulating material later, when the ventilation is ready.
From the video you will learn how to trim and insulate the ceiling in the bath
After installing the insulation, the walls must be covered with a special foil, turning it with a mirror surface inward. The joints of the foil are fastened with metallized aluminum tape. Due to the reflectivity of this material, most of the heat will be stored in the room. The steam room will quickly warm up and keep the temperature for a long time.
Lathing device
Horizontal elements are attached to the vertical bars. For this, bars of 3x4 cm are suitable. The distance between adjacent elements should be approximately 40 cm. At this stage, make a frame for benches. It is needed so that the weight is distributed evenly on the main frame, and not transferred completely to a small part of the skin.
Wall and ceiling cladding
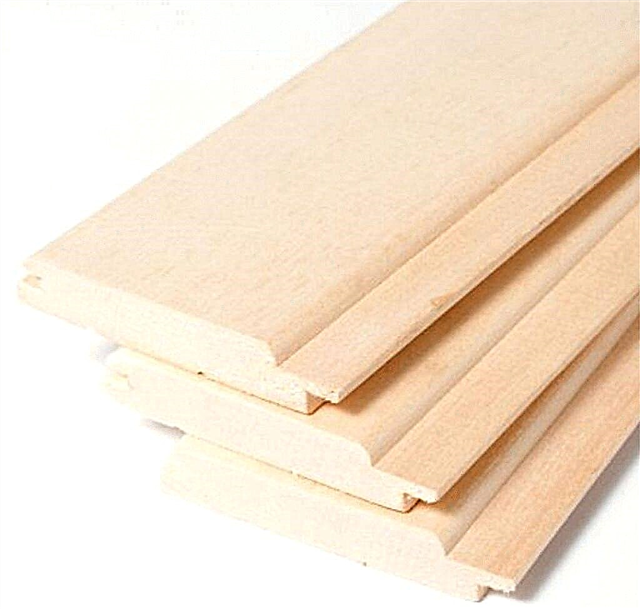
Sheathe the inside of the sauna is best clapboard. Suitable varieties of wood are pine, linden and alder. Each tree has its own merits. Linden has a pleasant appearance and produces a wonderful aroma. It also has a beneficial effect on health. Linden wood has long been used for the construction of baths.
The lining of alder retains heat well, while it does not heat up too much, so there is no risk of getting burned. Wood has a diverse palette of shades and a beautiful pattern. True, alder has its drawbacks: the wood is soft, so dents appear on it from impacts.
Pine - a leader among sauna lining materials
As for the pine, it leads among all varieties of wood in the frequency of use for the installation of saunas and baths. When heated, the tree releases substances that are healthy. If in a particular area there is not one of the listed types of wood, you can use another. You can navigate by what the local population uses.
Making a sauna with your own hands is not so difficult, but lining is the most time-consuming step. It is important to be careful and not rush. First, the lining must be cut to the height of the room. Then they begin to sheathe from the corner, moving around the perimeter step by step. Processing the lining in the steam room is not required.
If you really want to extend the life of the rails, you can cover them with special wax or natural oil, designed specifically for saunas (not to be confused with products for dressing rooms and washing departments!). The result of this treatment will be that the sauna in your home, built with your own hands, will last 5-10 years or more without replacing the lining.
The device shelves and doors
When installing supports for shelves (benches), it should be borne in mind that the recommended ceiling height in the sauna is no more than 210 cm. To make it convenient to climb the bench, a step is made at a height of 25 cm. The lower shelf is placed at a distance of 65 cm from the floor.
Shelves - an important element of any steam room
The top shelf should be located at a height of 1-1.1 m. Thus, the distance to the ceiling will be large enough so that a tall person can comfortably accommodate on the bench.
Door features
The door to the sauna can be completely made of wood or partially glazed. In the first version, the presence of finishes in the form of artistic carving is welcomed. If a door with glass is selected, it should be tinted. The size of the door for the sauna is selected depending on the opening.
Keep in mind that the height from the bottom edge of the door to the floor should be at least 10-15 cm. Standard door sizes start from 7x19M (modules). The module is 10 mm. The largest standard size is 10x20M.If you need a wider or higher door, you can order the manufacture of individually.
The inner door should be without locks and any serious latches. Only magnetic locks are allowed.
Installation of equipment and fittings
The equipment is installed only after the sauna is fully built and finished. Since you can also build a sauna in a separate room, it is worth considering the option of a real stove.
But if the bathhouse is heated by a wood-burning stove, first you need to put it, and then finish the finishing work. If there is not much experience in the construction of furnaces, it is better to do with an electric stove purchased in a store.
It is installed so that the lower part is located at a height of 20 cm from the floor.
Of the boards that were used to arrange the seats, a fence is made around the stove. The distance from the boards to the heating element should not be less than 5 cm, and the height of the fence should not exceed the height of the heater by more than 5-6 cm. Stones are placed in the gap between the fence and the heater, trying to keep the air gaps between them as small as possible .
Now you need to install a lighting device, a thermometer, a device for measuring humidity. If you want to keep track of time, you can hang an hourglass on the wall with a standard scale of 15 minutes.
Talkochlorite (soapstone)
The stone is remarkable in that it emits the same spectrum of thermal radiation as the human body. It warms up well and evenly, remains hot for a long time. The healing effect is as follows: immunity is strengthened, blood circulation is normalized, and the state is relieved with hypertension.
At the end of the work, the shelves should be cleaned with sandpaper and rinsed. On this, the construction of a modern sauna with one's own hands can be considered completed.
Stage 2. Preparation of consumables
Immediately make a reservation that it is not worth saving on building materials, since in the future all costs will more than pay off with an attractive appearance and a long operational period.
It is difficult to advise anything specific, because the materials largely depend on the design features, financial capabilities and personal wishes. But you can make a general list, it will look like this:
- bars, logs and boards,
- a rock,
- roofing materials,
- sand,
- pipes
- cement,
- glass,
- clay,
- vapor and heat insulating materials.
Now in more detail about the choice of materials. With regards to wood, which will be used in construction, it must be durable and at the same time effectively retain heat (this applies more to coniferous species). It is worth remembering that during operation, the pores in the wood will be filled with moisture, which can cause destruction of the material, therefore it is recommended to finish the ceiling and walls with vapor barrier.
For benches, it is better to take an African oak - it is characterized by high strength and lack of resin.
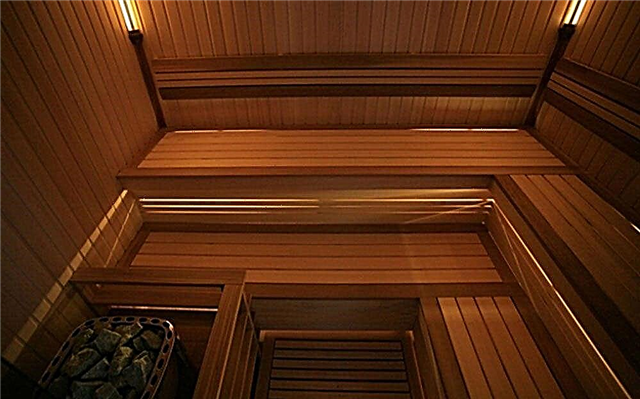 African Oak Sauna Shelves
Lighting should be dim (ideally, small lamps with wooden lampshades) so that the atmosphere is calm and relaxing.
 The lamp for a sauna
Pay attention to the material the door is made of - it must be not only durable, but also resistant to high temperatures. It is recommended to put glass doors - they are produced today in various shapes and colors, so everyone can choose a suitable option.
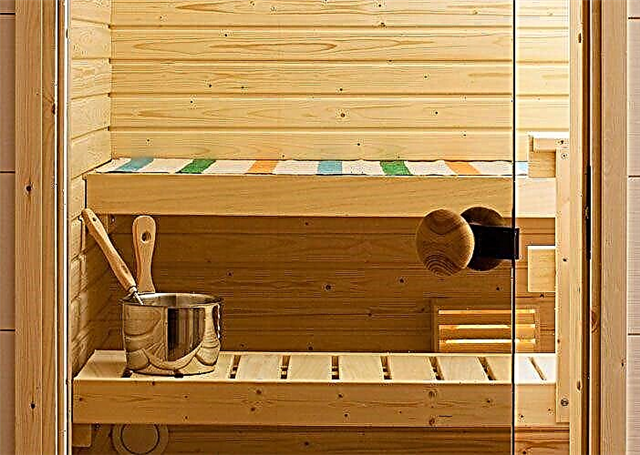 Glass door for the sauna
After preparatory work, you can begin construction.
Stage 3. DIY construction of a sauna
It is very important to clearly follow the step-by-step instructions, otherwise in the future, after five minutes after being in the sauna, a person may feel unwell. There are no trifles, every nuance is important and is aimed at maximum comfort and benefit for the body.
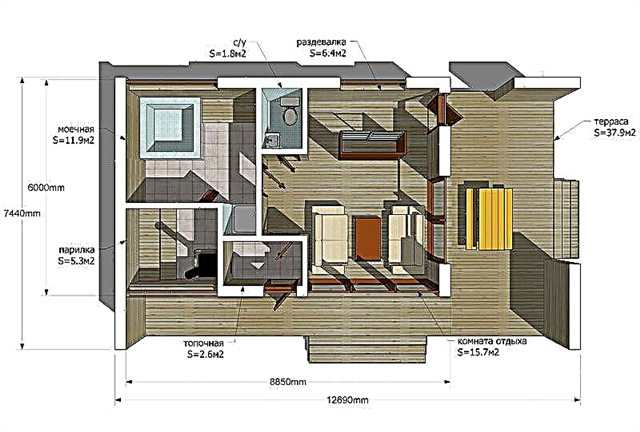 Project of a sauna with a terrace. 81 m²
Step 1. PaulCoverage selection
Just make a reservation that a traditional wooden floor is not the best solution. But if it was decided to equip this particular coating, then it, like other wooden surfaces, should be varnished after installation.
 Wooden floor in the sauna
 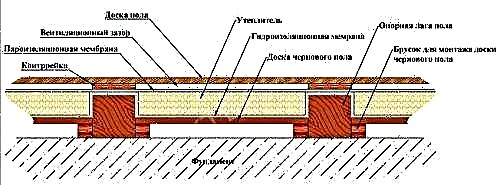 Wood floor scheme
A more suitable option is a simple floor tile - there are no special requirements for this material, it is characterized by ease of installation and further operation.
 Tiled floor in the sauna
After choosing a coating, you can begin to build a foundation.
How to build a sauna in the country yourself.
Sometimes one wants to leave the bustle and noise of the city, and go to the country. Silence, walking, doing things you love - what could be better! If comfort is provided in the country, I want to come again and again. One of the comfortable living conditions in the country is a bathhouse.

Construction can, of course, be entrusted to professional builders. However, it is quite possible to build and equip a bathhouse at a summer cottage independently. This eliminates additional costs and allows you to finish and improve in full accordance with your desires and preferences. Therefore, this task is not easy, but the beginner builder is quite capable of it. Own built bath will please the owners even more. So, how do you build a bath yourself?
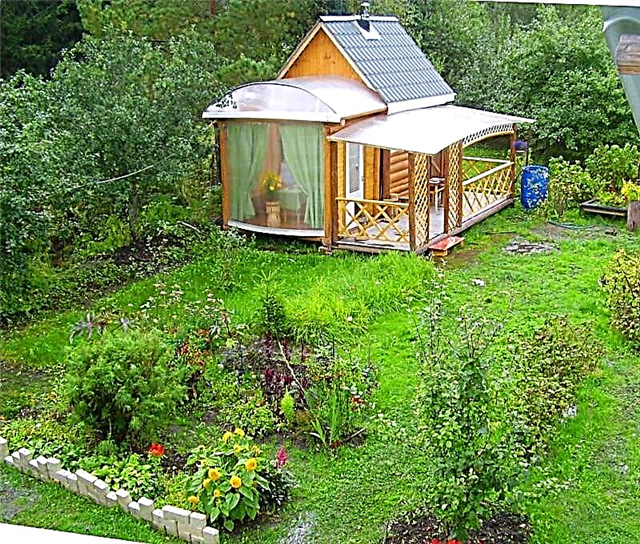
Firstly, as with any construction, you must first determine the project and the materials from which the bath will be built. The choice of basic material for construction depends on the geographical location and operating conditions, as well as on your own capabilities.
Baths come from brick, aerated concrete and other stone materials, some prefer frame baths, however, many novice builders prefer to build a bath from a tree. This light and durable material does not require a serious and expensive foundation, but it has excellent characteristics. With proper care, the operation of the bath will not cause much trouble.
And of course, preference should be given to timber - a bath made of this material will retain all the advantages of a wooden structure and save from problems and additional costs that may arise during the construction of log walls. Building walls from a beam is similar to working with a designer - it can have different geometric sizes and cross-sections (rectangle, square, semicircular), and also, in the case of a profiled beam, there are grooves for fastening. Building from timber is easy and convenient - what could be better for a novice builder!
How to choose a place to build a bath.
One of the most important points is the choice of the location of the future building. The place must satisfy both existing legislation and usability. When choosing, basic recommendations can help:
- if there is a pond nearby - do not place the bathhouse too close to it, as the building will be in danger of flooding,
- it is necessary to decide how the bathhouse will be located relative to the house: as a separate building or will be attached to it, since each option has its positive and negative sides,
- it’s believed that it’s better to build a sauna in the backyard, in relative seclusion,
- it is necessary to provide for mandatory ventilation during construction, as well as provide for the disposal of wastewater,
- It’s highly discouraged to determine the location next to a passing road,
- when placing the building, it is necessary to take into account the cardinal directions and the direction of the wind: the best place is the southern part of the site, protected from the wind so that it does not interfere with vacationers, it is better to have windows facing the west,
- it is desirable that the bathhouse is located at some distance from other buildings, and if it is an extension to the house, it is imperative that the rules of fire safety be observed during construction, as, indeed, when erecting a separate building,
- when determining the location of the bathhouse and its size, it is necessary to observe the distances established by the rules from the boundaries of the site so that the neighbors do not feel any discomfort and make claims to the owner,
- It is recommended to observe the distance to the water intake (well or well) - not more than 20 meters.

Bath layout: recommendations.
At the beginning of construction, it is highly desirable to make a project, which should, inter alia, determine the optimal area of construction.

It is believed that the estimated area for 1 person should be approximately 5 sq.m. Thus, if the estimated number of visitors to the bath will be 4 people, its total area should not be less than 20 sq.m.

The minimum composition of the premises is as follows: steam room, washing, relaxation room and dressing room. It is important to determine the most convenient location of these rooms relative to each other, as well as their geometric dimensions.

First, you need to perform several diagrams and drawings:
- general building plan,
- drawings of each room individually,
- foundation device diagram,
- roof device diagram,
- plan for fastening and laying out the beam,
- plan for the floor and ceiling of the bath,
- The installation diagram of the furnace, taking into account its structural features.
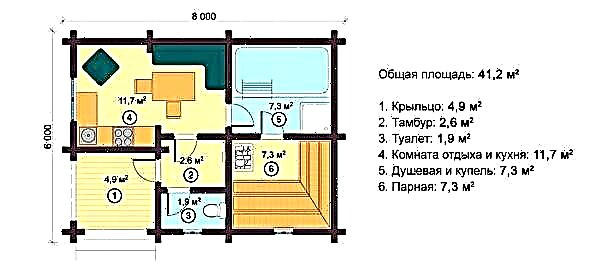
All the necessary drawings can be done independently, as well as found in a variety of open sources. As a rule, saunas made of timber have similar designs and you can easily choose the most suitable. If you wish and have the necessary budget, you can order a design to a professional architect or builder.
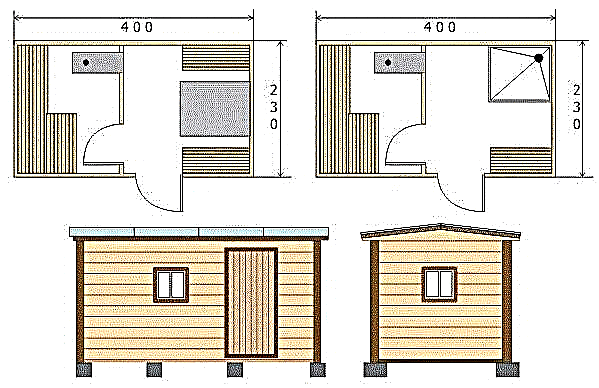
The choice of building materials.
The following is a list of materials that will be needed to build a bath from a bar:
a) a beam of 150x150 mm, although it is possible to use a beam with a section of 100 mm or 200 mm,
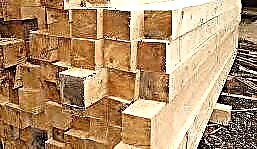
b) floorboard (edged board 150x50 mm 4 meters long is perfect),

c) boards made of hardwood for ceiling installation (usually lining is used with a width of 100 mm and a thickness of 20 mm or more),

d) material for wall decoration (as a rule, the same lining is used),
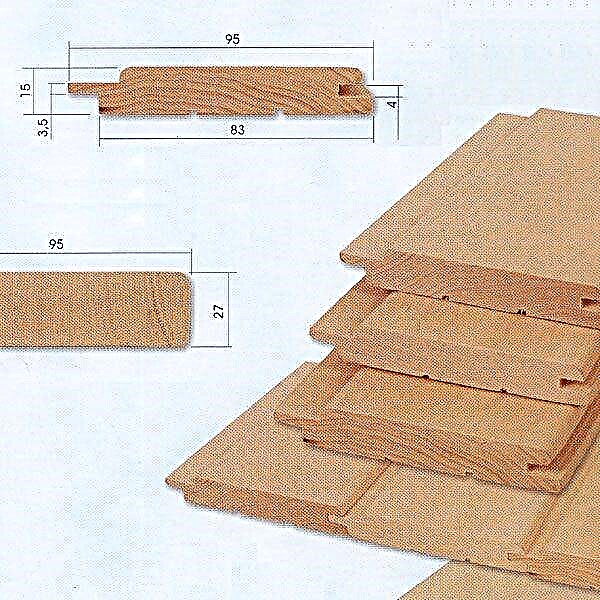
e) material for vapor barrier (an excellent option would be to use a vapor barrier film),

e) waterproofing (it is advisable to use penofol, although a plastic film is suitable),

g) ceiling insulation (a good option is mineral wool materials),

h) sheet asbestos for insulation of wooden structures from temperature effects, including for walls near the stove and elements located next to the chimney,

i) cement, sand and crushed stone for the installation of the foundation (recommendation - cement should be purchased before construction),

j) roofing material for the roof, which can be selected based on personal preferences and most importantly, that it fits seamlessly into the surrounding roofs of other buildings,
 Thatched roof is comfortable unusual and cheap
  Roofing Shingles
  Polycarbonate roof for bath
k) insulation for interventional space (it is better to use jute, although moss or tow will work fine).

The best time to start construction is spring, because after the completion of the main construction work it is necessary that the timber is dry and shrink. This requires at least 6 months.
Step I - preparing the territory for construction.
Before starting construction, it is necessary to clean the area - remove shrubs, stumps, remove garbage and all that will interfere with the work on the foundation.
 Preparation of the site for the construction of the bath
  Preparation of the site for the construction of the bath
Step II - building the foundation.
It is best to build a beam bath on a columnar foundation, which is inexpensive and excellent for the construction of small wooden and frame buildings.

When constructing it, you must first dig a calculated number of pits for mounting supports. Their number is calculated as follows - the supports must be installed in the corners of the building and at the intersection of the walls, as well as with a certain step along their perimeter.

The step is selected, taking into account the type of soil and the estimated total weight of the structure. The depth of the pits should be 1-1.5 meters, although depending on the depth of freezing of the soil in a given area, it can vary.To perform this type of foundation, in addition to the materials listed above, asbestos-cement pipes and fittings will be required.

At the bottom of the pit, it is necessary to fill in a mixture of sand and gravel 10-15 cm thick. Then install an asbestos-cement pipe of the required length into it, strictly vertically, and fix it. Inside the pipe, several bars of reinforcement should be placed.

After that, pour concrete solution into the pipe and into the free space between the walls of the pit and the pipe.
 How to make a column foundation
  DIY column foundation
After pouring the solution, you need to wait a few days, and then put a half-brick-thick wall between the posts.

Step III - the construction of walls and the arrangement of the roof.
The traditional material for the erection of the walls of the bath is a beam measuring 150x150 mm. Before laying the first crown, it is mandatory to put waterproofing on the foundation. The lower part of the crown must be treated with an antiseptic. Most often, the timber is laid out in a “paw” way.
 Join the bar in the paw

The first crown must be carefully aligned in geometric parameters - all angles should be exactly 90 degrees. After the first crown is erected, begin laying the bars for a set of walls. Laying out the walls, it is necessary to make openings for future doors and windows and it is imperative to insulate each row with the selected heat-insulating material.

To connect the crowns, pins are used - metal or wooden pins.
After the walls are withdrawn, the roof device is installed. Depending on the chosen shape of the roof, it is necessary to fix the rafters, which are attached to the upper crown with brackets.

When a single-pitched sloping roof is installed, the rafters are fixed either with two external, or one external and one internal supports. When erecting a gable roof, the rafters from below must be reliably supported on the wall, and connected together from above to form a roofing ridge.
 Floor beams
  Roof inside
Lathing boards are attached to the fixed rafters, then hydro- and vapor barrier, insulation are laid on them.

The roof device completes the installation of the selected roofing material.

Step IV - Interior Finishing Work.
The interior decoration needs to start with the communications device - sewage, water, electricity. About sewage should be worried even in the design and construction of the foundation.
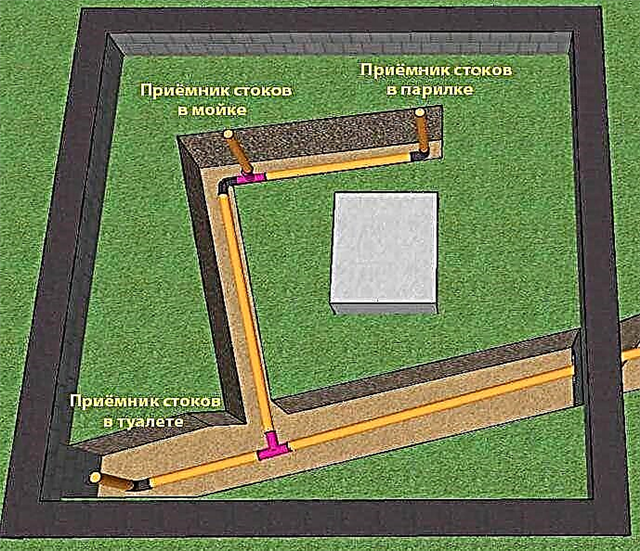
It is necessary to dig a drainage well next to the future bathhouse, which includes a sewer pipe buried in the ground with a slope to remove drains from the washing compartment.
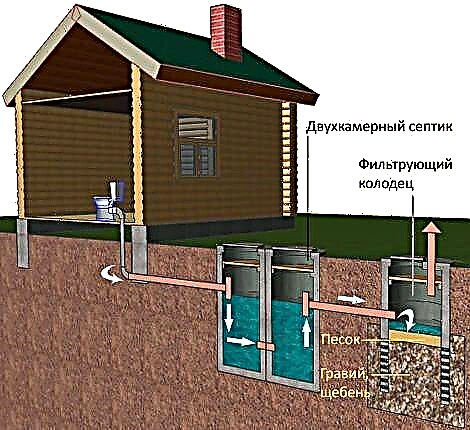
After completing the installation of the sewer, a finishing floor is made, which is made of wood or concrete. The concrete floor is more durable, most often it is tiled with tiles or porcelain.
If a wooden floor is selected for interior decoration, it is usually leaking. To do this, the floor boards are beaten to the installed lags with a small gap, or a small drain hole is closed in the floor, closed with a grate.
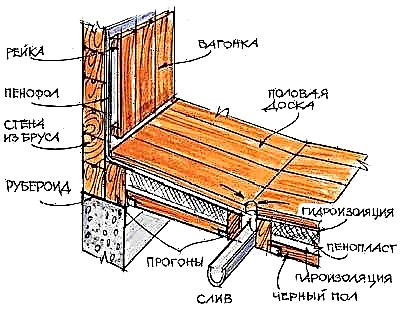
In this case, the floor must be done with a slight bias towards the drain. Then the water entering the drain will be discharged through the sewer into the drainage well.

After the sewage system, it is necessary to carry out insulation, hydro- and vapor barrier of the walls and ceiling using appropriate materials, to conduct electricity and water supply.

After installing windows and doors, then finish the premises using, for example, lining.

After finishing, you need to install the necessary electrical appliances.
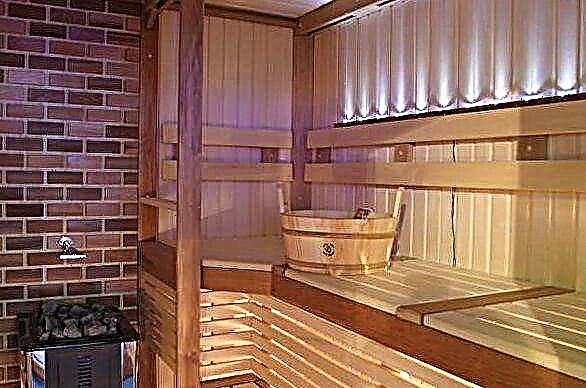
Step V - Install the oven and shelves.
There are a lot of options for placing shelves, you just need to comply with the recommended sizes and that they must be made of hardwood. The installation principle is simple - a stable frame is mounted, usually from a beam, and boards are attached to it.
The furnace must be installed in full compliance with fire safety requirements. Wooden structures must be isolated from the effects of high temperatures of the working furnace and chimney. If the furnace is heavy, it must be installed on a specially equipped foundation. This is determined in each case, depending on the selected furnace.

The stove is selected depending on the preferences of the owner. It can be a traditional wood-burning stove, a metal wood or electric stove, sometimes it is advisable to choose a gas stove for a bath.
For more information about choosing a stove for a bath, read our special article "How to choose the right stove for a bath."
Step VI - Choosing Accessories
There are many accessories for the bath.

The main ones are:
- brooms (oak, birch and others),
- containers (buckets, basins),
- a wooden ladle for adding water,
- wooden lattices on the floor and much more.

The interior decoration of the premises, which remains at the discretion of the owner, can add an additional personality - here, depending on your desires and financial capabilities, you can give free rein to your imagination.
It must be added that all of the listed accessories can be made independently. The bathhouse is a great place to spend time in a pleasant, friendly company or with your family. It will be much more pleasant to realize that all this is done with your own hands, including useful and necessary devices: for example, hangers, lamps or ventilation grilles.
Foundation construction
The depth of the foundation laying is determined by the level of freezing of the terrain, in this case - 60 cm. To determine its parameters, you need to look into the design of the bath. If there is no design documentation prepared by specialists, the type of foundation is determined depending on the material of the walls.
If you decide to put a frame bath, it will be enough to make a small strip foundation. To equip it on a prepared flat surface, a square formwork is installed from 2 parallel boards. They are fastened with the help of self-tapping screws, cross-beams are additionally used to subsequently lay the bar.
You also need to take care of the ventilation of the foundation, make appropriate bookmarks. In order not to make a mistake with the dimensions and direction of the trench under the foundation, it is more expedient to first make the formwork, and then dig a trench in the space between the boards. It is better to immediately pour the dug up soil into buckets and carry it away from the site in order to prevent pollution.
The formwork is installed around the perimeter and under the internal partitions, as well as where the furnace will be installed. So the load will be distributed more evenly. It is also desirable to conduct reinforcement. Trenches are filled first with sand to reduce the load on the base, and then with concrete mortar.
When it hardens, it remains only to unscrew the screws and disassemble the formwork. Usually in 5-7 days concrete gains strength. In dry and hot conditions, it is recommended to water the foundation with water.
Arrangement of the floor of the bath
First, roll-up waterproofing is required to be rolled between the foundation elements and along the foundation itself. It can be a regular roofing material. It is also used for waterproofing in the recesses of the foundation, designed for logs, which will become the basis of the floor.
So that the logs do not bend during operation, they are additionally strengthened with intermediate supports. The upper part of the foundation is also waterproofed. Next, it remains to put a floorboard, starting from the edge of the foundation. It must be treated with an antiseptic.
Frame manufacturing
The next stage in the construction of a frame bath with your own hands is the manufacture of the frame itself. 4 separate wall blocks are made of edged boards, leaving holes for the window and doors.It is necessary to collect the workpiece on the ground, on a completely flat area.
When the workpieces are ready for installation, they are installed vertically and fastened in pairs with self-tapping screws. It is very important to observe the correct connection angle, monitor the level. Externally, frame racks look like hollow structures of vertical and horizontal elements. After installation, it is necessary to once again check the evenness, and only then begin to erect the roofing system.
Roof arrangement
The next step in the step-by-step instructions is the construction of the roof of the frame bath.
Its installation begins with the installation of a lag 2 floors. Next, a layer of boards for overlapping is applied to the resulting beams. Then the rafter system is mounted. Do not forget that you have to remove the chimney, so in the rafter system you must leave the appropriate space. Next, waterproofing is put, a counter-battens, a battens are made. The installation of the roof is carried out.
The space under the gable roof can be actively used to store brooms and other useful things.
Covering the walls of the bath
The voids in the bathtub frame are filled with insulating material. You can use mats, rolls. But mats are much more convenient, they are simply inserted into the existing voids of the frame. Roll material will need to be cut in accordance with the dimensions of the intermediate elements of the frame rack.
When arranging walls, do not forget about vapor barrier and waterproofing. When the film is fixed, begin the exterior decoration of the bathhouse in the country with a blockhouse.
Next, you need to install the doors and windows.
Interior decoration
Inside the bath is sheathed with another layer of thermal insulation, as well as vapor barrier. Joints must be glued with duct tape. Over this wall are lined with clapboard.
When performing the decoration of the walls of the steam room, you need to make 3 layers:
Appropriate equipment is installed in the shower area. Walls at the place of installation of the shower enclosure should be finished with tiles, mosaics or plastic wall panels.
Veranda
The next stage in the construction of the bath is the construction of the veranda. It will require a shallow columnar foundation. Next, they make the basis of the board, for this they are put on the end, so the deflection will be excluded.
Then assemble the frame of the side structure, consisting of vertical supports and the upper cross member, the main load of the roof of the veranda will go to it. The frame is attached to the base with anchor bolts.
Between this frame and the roof of the bath set connecting elements that cover the crate. Roofing material is laid on top, slate or other roofing material can be fixed on top.
A deck of boards is attached to the base of the terrace. The existing voids in the side frame are filled with blanks with a decorative wooden grill.
Drain arrangement
The arrangement of the discharge from the existing water intake should be taken care of at the early stage of the construction of the bath.
Firstly, it is necessary to lay a sewer pipe with a slope of 1 meter 3-5 cm. Such a pipe should go from the shower and from the tap to drain the water from the pipeline system. It is at the bottom of the pipeline.
Such a tap is needed to drain the water from the system and preserve the bath for a long time, for example, for the whole winter. It is better if the drain pipe does not have branches and turns. A straight pipe is a way to avoid blockages.
The diagram shows how best to connect two water inlets in one system.
It is better to connect the sewer pipe with a septic tank so that the drain water does not go into the ground.
Step 2. Foundation
If it is planned to build a separate room for a sauna, then work begins with the preparation of the foundation. In principle, for such a case, a foundation of any type is suitable (columnar, monolithic, tape, etc.). The strip foundation is shown in the image (a trench 0.5 m deep is covered with a 10-centimeter “pillow” made of gravel, reinforced with metal rods, fenced with formwork and filled with concrete mortar).
 The foundation for the sauna
Step 3. Wireframe
A five-level harness is being erected from the timber. First, with the help of chalk, the fixation points of the bars are marked:
- the first level should be 3 cm from the floor,
- the second is 60 cm,
- the third - in 1 m,
- the fourth - at the same distance from the third and fifth,
- fifth - 5 cm from the ceiling.
Then, holes are drilled in the appropriate places, and the bars are attached using self-tapping screws and plastic dowels. For the manufacture of the ceiling frame, larger boards are used - they should be parallel to each other.
Note! When making the frame, do not forget about the doorway. For this purpose, a pair of racks is equipped (for fixing the box), and a wooden bridge (for fixing the casing) is mounted on top.
Step 4. Wiring
Due to increased humidity and temperature, the sauna adversely affects electrical wiring. For safety reasons, a heat-resistant wire must be used, preferably with double insulation.
Initially, the estimated power consumption is determined. So, if electricity is required only for lighting, then 2 kW is enough. But if you plan to connect household appliances (washing machine, hair dryer, etc.), then the wiring power should be at least 5 kW.
Particular attention should be paid to the location of the fixtures. For example, in a sauna with a small area, two devices installed on both sides of the upper wooden bench are enough - this simple move will allow for uniform and soft lighting.
Steam insulation prices Izospan
Then you need to take care of the vapor barrier. To do this, you will need aluminum foil, which should be attached to the frame with a reflective surface inside the room. To fix, use push pins or mounting tape. Foil is necessary for quick heating and long-term preservation of heat (like a thermos).
Step 5. Covering, lathing
Horizontal beams are mounted from the beams with a pitch of 40 cm. Transverse frames are installed (for mounting benches). The sauna is beaten, and a ventilation valve is mounted above the place where the stove will be located.
- Outside, the room is sheathed with a clapboard from any tree, you can use ordinary nails (they do not heat up, so they do not carry any danger).
- Inside, the room is finished with a profile linden or alder lining. It is important that the profiles have a long comb, otherwise the boards may diverge in the future.
The lining procedure is quite simple. You can use one of two existing methods.
- Fasten the boards with a profile grip.
- To use one more trick - to nail ordinary nails from the bottom of the tongue and cover them with a comb. It is characteristic that the hats should not remain outside, otherwise they will heat up and burn the skin.
Issue price
It is difficult to unequivocally answer how much it will cost to build a sauna. There are a number of factors that affect the overall cost. The main one, as noted earlier, is whether the premises are being converted or a separate extension is being built. Another factor is the area of the steam room. In addition, the cost is affected by the materials used for sheathing, the number of fixtures, other furniture, doors, etc.
Do you like the article?
Save so as not to lose!