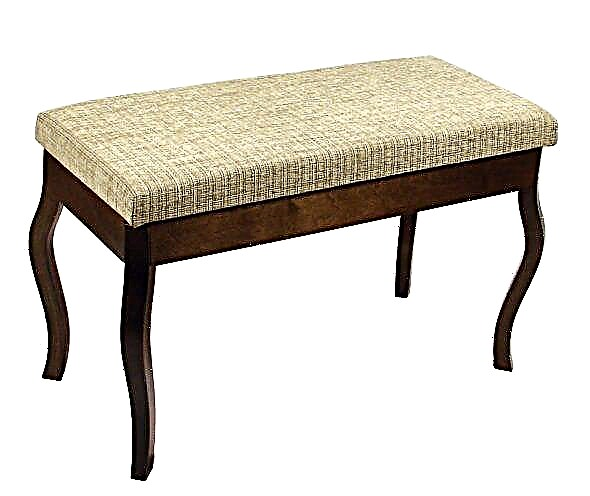
A bench made by hand has many advantages. So, you can independently choose a shape with size and color. At the same time, it can become unique and unlike factory products and it can be made from outdated furniture, for example, a stool or a coffee table.
You can make a banquet for the hall with your own hands based on assembly instructions, your own experience, knowledge of working with tools and imagination.
What is required for this
To create a unique creation and decorate the hallway, you should work:
- with a drill
- screwdriver
- furniture stippler,
- sewing machine
- with a screwdriver
- emery paper
- furniture varnish.
It will also require fabric materials, a headset, wood or iron for the basis of the product, knowledge and experience with the above tools, a little imagination and following the assembly instructions.
Which material to choose
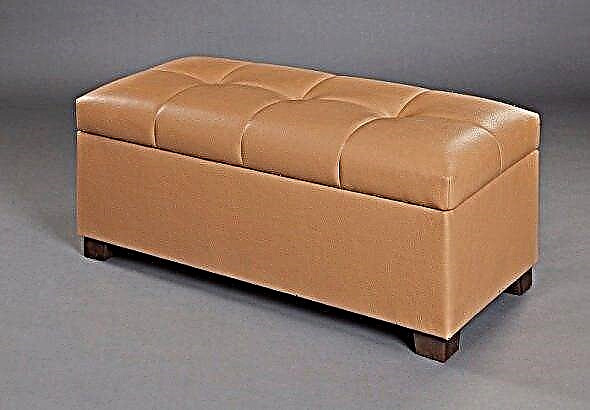
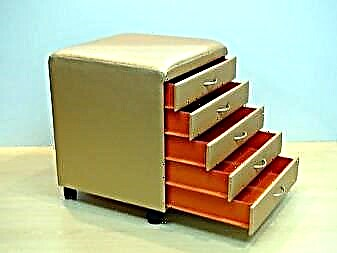
The bench is forged, wooden, collapsible, fabric, leather and leatherette. It can also be done with drawers and with a back. We will analyze each material.
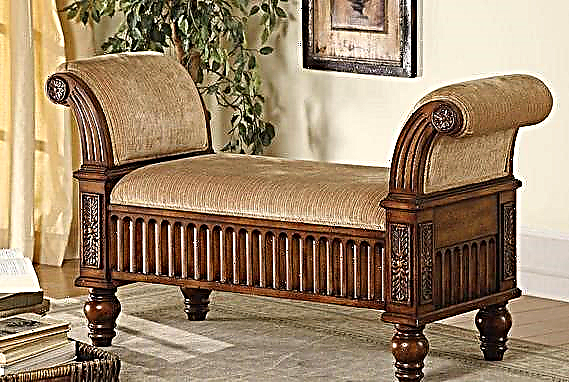
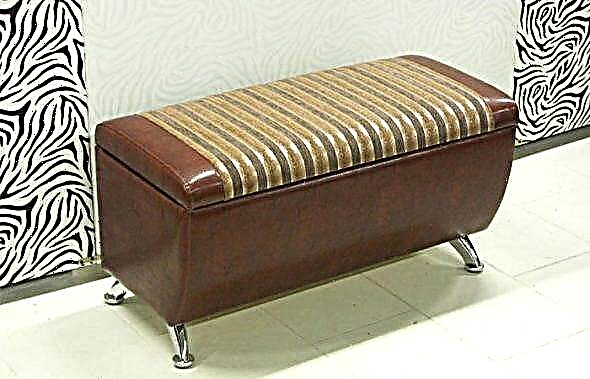
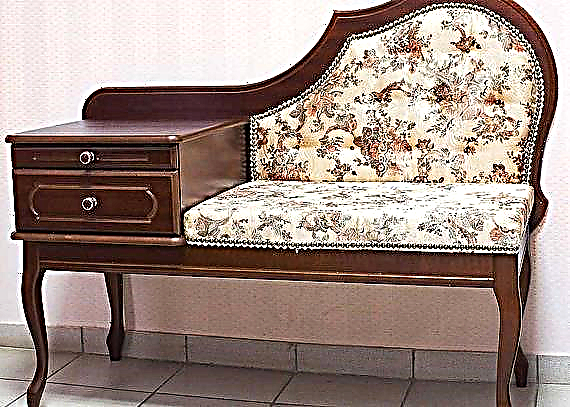
Wrought iron bench fits the Empire and Baroque interior. Wooden products can be made with drawers and cabinets. The folding bench is functional, with an ordinary design and quick disassembly. Fabric banquette can be made of silk, cotton and linen. It is suitable for any interior style. A leather product is not suitable for every interior and looks expensive. It is expensive and difficult to care for. A leatherette product does not look as expensive as the previous one and has a short life, but it fits any type of interior.
A pouf with a back will create coziness. It can be brightened with any soft pillows. A pouf with drawers is useful: it can save space.
Everyone can make a banquet from any material. It is better for novice inventors to stop on a tree rather than iron because of the simplicity of working with it. In addition, to work with the tree does not need any special skills with experience. To make a frame, you need to take sheets of chipboard or plywood. During the construction of the product on the legs - wood beams. You can buy them ready-made or build them yourself.
Drawings and schemes
To get started, you need to create a diagram of the future product. It will be needed to determine the parameters of the bench and, in order to compare them with the volume of the room. When choosing material, you need to choose a simple material. For a pouf with a back or a drawer, it will take more time, therefore the novice master should assemble a simpler design. To create a scheme for a future product, it is required to draw a sketch drawing and note in it the dimensions of the future model. Wooden models need to be cut with an electric jigsaw, and uneven edges should be rubbed with sandpaper. After that, everything will need to be varnished.
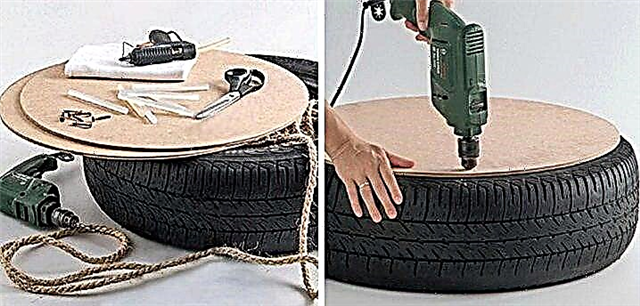
Lesson number 2: we make a banquet from improvised materials
Step 1: Cut the wooden block (or MDF) according to the size of the bench you need. I used ¾ inch plywood (or MDF) to avoid bending. Next, select the places where you would like to place the buttons (6-8 or at your discretion) and drill small holes through MDF or wood. Then fasten your block on top with a cement contact and place a foam rubber 2 inches high (reduce to that size) on top. You can find foam at your local hardware or hardware store.
Step 2: Put an additional layer of cotton wool on top, securing it to the base with a furniture stapler. Then pick up the excess.
Step 3: Put the fabric of your choice on cotton wool. If there is a picture, then make sure that it is located exactly before attaching it with brackets. If the upholstery is a simple square or rectangle, then fasten a few brackets on one side, and then a few on the opposite, pull the fabric tight and add a few more brackets.
Do the same with the two remaining sides. This will guarantee that the fabric is well stretched, otherwise you will end up with bulges and bumps, which, of course, were not expected.
Step 4: Finish the corners. They should look at the very beginning as in the photo. Then pull the left edge to the right and fasten with a stapler. Then pull both edges to the left and fasten with a stapler.
Step 5: Now it's time to decorate. You can buy buttons or a set of buttons at your local hardware store. Mine look like this:
Attach the buttons as indicated on the package.
Step 6: Insert a strong and thick thread into the large eye of the needle. Do not cut the thread.
Step 7: Enter the corner and the thread through (from the back to the front) of the bench through the drilled holes in the places where you want the buttons to be located. You may need to use pliers to grab the needle and extend it to the end.
Step 8: Pass your button through the thread, and then push the needle back. This may require some effort, but continue the effort and you will succeed.
Step 9: Tie the thread to the washer at one end of the string, and then use both ends to tie a knot. Let the friend or spouse press the button, while on the other hand you will tighten the knot, make sure that all buttons have the same depth.
Upon completion, the button should look like this:
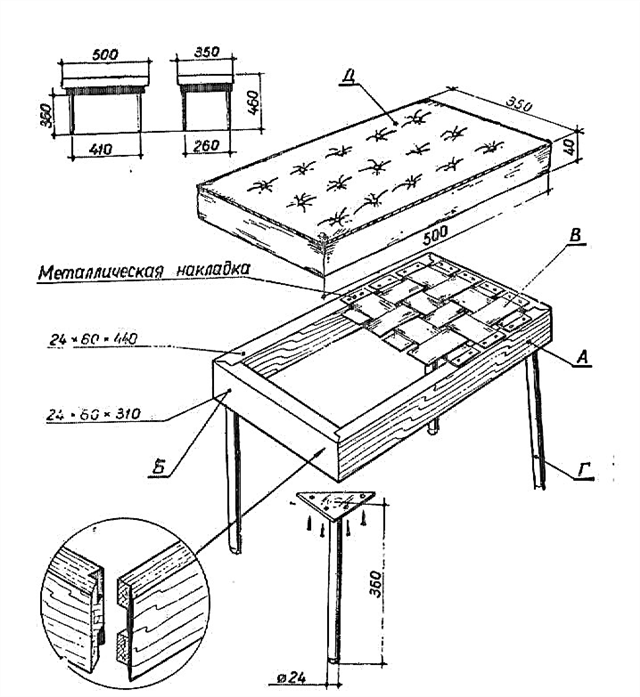
After you have done all the buttons, you should make a stand. I decided to make the base of the banquet from old pieces of 2 by 2 inches, which we have left after the repair of the house.
Step 10: Then we cut our bars as follows: 6 pieces 2x2 in size 12 inches, three 2x2 in size 19 inches, four 2x2 in size 22 inches. Here is a color image that shows how we put everything together. Figure 1 is a side view, the figure below is a top view.
Step 11: Combine the base into a single whole.
Step 12: Attach the base to the upholstery. We used liquid nails, and then nailed diagonally the upper part to the lower. Nails nailed diagonally simply mean nail them diagonally.
And so we are done, this is how the banquet in our bedroom looks like.
We are so pleased that our new banquet, which is incredibly functional, serves as a reminder that our upgrade experience was made primarily from recycled materials and cost us nothing at all.
Banquet decoration
Buttons should be selected in accordance with the shade of the upholstery of the bench seat. Their number depends on personal desires. The bench can be varied with a decorative cover. It is usually performed in the same style as the upholstery. Such work is not difficult. You only need to be able to work on a sewing machine.
In the absence of cutting skills, you should choose a ready-made pattern. You can learn how to create it in certain master classes. Calculate in advance what capacity a banquette will have. An area of 45x50 cm is required for one person.
The elements of the banquet are cut using a jigsaw. Their edges should be sanded. When installing the pouf in the hall in the Empire style, a carriage screed can be made. Similar products look presentable and original.
It is important to determine the size of the hallway and the dimensions of the manufactured banquets. In the case of a large number of parts, you should first make a pattern, and then start cutting plywood
Tools
To create a high-quality and durable bench seat, you will need to use the following tools:
- Screwdriver and drill - using these tools, various holes for fasteners will be made.
- A hammer and a screwdriver are indispensable helpers for every joiner.
- Construction stapler.
- Level - to determine the vertical location of the legs of the bench.
- Sandpaper - it should be of different stiffness.
- Manual mill - in the case when the base of the bench is made of beams.
- Sewing machine - for sewing upholstery and cover. For such work, you will need more scissors and tape measure.
- A piece of chalk.
First you need to cut the seat. This is necessary, since the creation of the remaining structural elements depends on its size. They are subsequently adjusted under the seat. In the absence of sufficient experience in creating furniture, it is necessary to divide all the work into several days
So every detail will be done with due attention.
Of what?
You can make a banquet from different materials:
- Forged metal. This option is suitable for baroque, renaissance or empire styles.
Forged products can be decorated with leaves and flowers, vines, numerous curls of various shapes. They will give the product openwork, airiness and exclusivity.
They do not have drawers, additional shelves and cabinets. They are appropriate to install in the hallways or on the verandas. Making forged furniture yourself is quite difficult. This requires special equipment, materials and the ability to work with a welding machine.
Also for the manufacture of soft banquets used textiles:
- The cloth. It can be silk, cotton, linen. Such fabrics are unpretentious in care, are distinguished by a wide color palette and environmental friendliness.
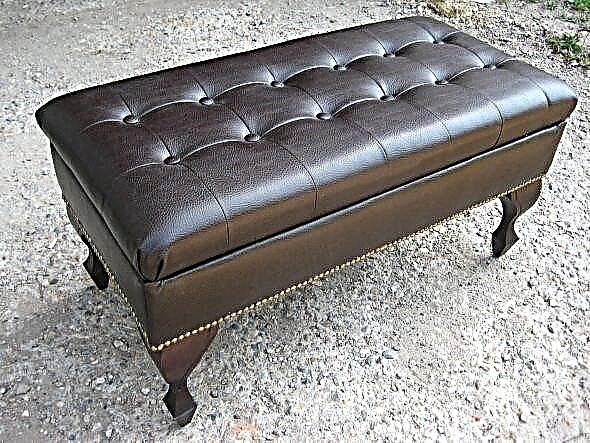
- Leather. This material is suitable for upholstery of a furniture item in classic interiors. But genuine leather is difficult to care for and has a high cost.
Nevertheless, banquets with such upholstery look noble, elegant and luxurious.
Jewelry
To update old furniture and make a banquet out of it, it is not at all necessary to spend a lot of time and effort. The main thing in such a product is softness and availability of storage space (boxes, shelves). When the transformation of old furniture is already completed, it's time to think about jewelry. When translating your ideas and fantasies into reality, you should not limit yourself. After all, the banquet made should be pleasing to the eye, and not sadly stand aside
Therefore, it is important to design it in such a way that it simultaneously catches the eyes of the guests and harmonizes with the interior
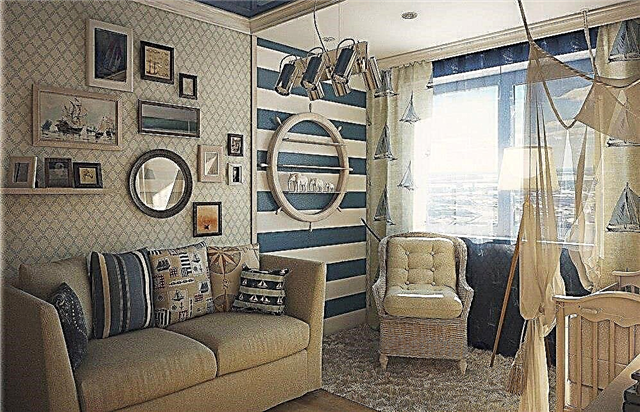
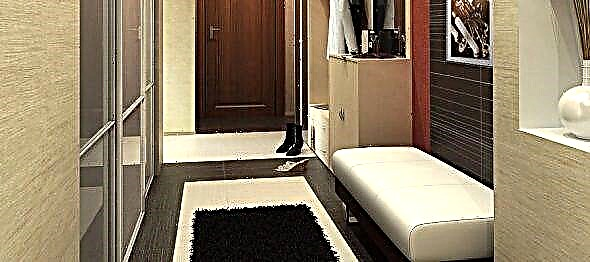
For the hall, a product made in the classical style is suitable
This is especially important if you also need a shoe shelf. The purpose of the banquet in this case is more for storing shoes than for a comfortable stay on it
At the same time, it should be noticeable and have a skin made of leather or leatherette. In a children's room, such a product can have any style. The main thing is that he takes into account the situation. For a girl, a banquet can be decorated with velvet and voluminous flowers. It will be very interesting if the cover is connected by mom. For a boy, a product in the form of a soccer ball will become original. Even more interesting if there is a place for storing toys inside it.
Often, banquets are made specifically for a wedding. Guests are located on them very easy and simple. All banquets and pouffes at this event should be made in the same style. So they look very beautiful against the background of the hall. Satin ribbons or embroidered patterns will look very gentle on them. Of course, this is painstaking work, but such products look impressive.
Making a soft bench or ottoman with your own hands is not very difficult, but it requires attention and accuracy
It is important at the same time to correctly assess their strength and use a drawing that is suitable for a novice master. And we must not forget about the versatility of the product
They not only sit on the banquet, but also store small objects in it.
In the next video - a master class in the manufacture of banquets.
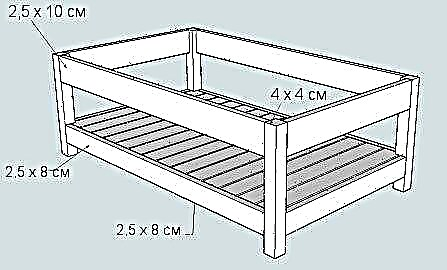
Lower shelf installation
In the installation of lamels, we start by placing pine planks on the sides. The whole further process is shown below in the photographs. Apply wood glue to one side of the pine plank, fix it. Then hammer the nails into the pine strips to keep them in place until the glue dries. Do it for both sides. Now place the base on the floor or work surface with the right side up. Using crosses that you can buy in any hardware store, fix the bars at a certain distance, one from one. Apply glue and nail each bar. Remove the crosses.
How to make a round bench stool with a carriage tie?
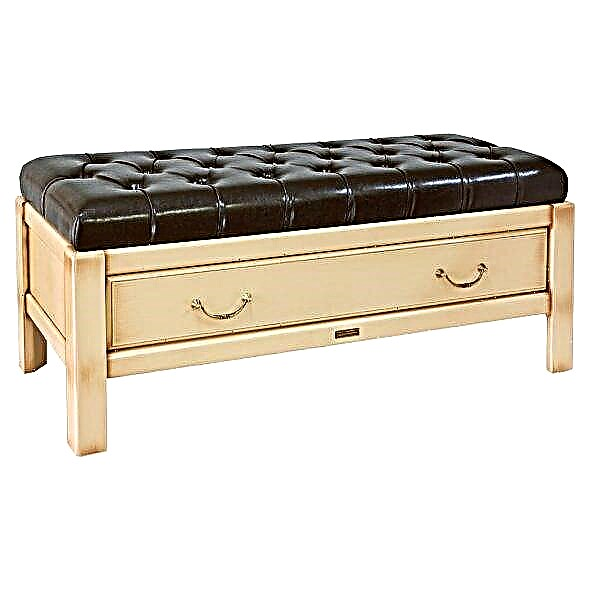
A non-standard way of decorating furniture is a carriage screed. It allows you to create volumetric surfaces with various patterns. Decorated in this way, models are suitable for interiors in the neoclassical style or for modern designs.
The manufacture of banquets-pouffes is quite easy, the novice master will have no problems. For repair work requires a standard set:
- hacksaw,
- drill,
- hammer,
- jigsaw (electric is best)
- saw,
- nails and other fasteners,
- glue,
- construction stapler
- paint, varnish, brushes.
Pencil, ruler and tape measure will be useful, with the help of which the necessary details and their location relative to each other will be marked. As materials use plywood and cardboard tubes. To cover the banquet, you will need a fabric, as well as a filler for the seat - for example, foam rubber.
Do-it-yourself puff stool banquet:
The tubes are cut into several parts - so that they are the same length. Then plywood circles are cut out from which the base will be made. For these purposes, use an electric jigsaw or (if possible) a band saw.
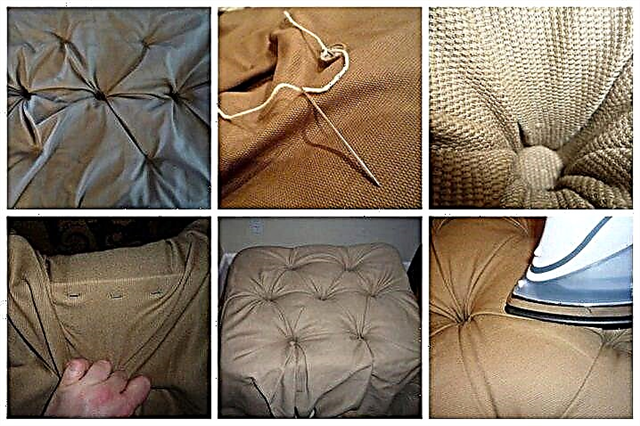
At the final stage, finishing work is carried out. The pouf is decorated with decorative rivets, crystals, which are fastened with decorative nails of small diameter. Fasteners are also used for additional tissue fixation: they are driven along the perimeter of the banquet every 15 mm.
A more detailed process of making banquets can be seen in the next video.
Bench from an old table
Such a banquet with your own hands is simple and fairly quick. This will require some materials:
- Foam rubber 5-6 cm thick.
- Thick skein of cotton.
- 1.5 cm thick plywood sheet.
- Aerosol glue.
- Fabric for lining.
- Construction stapler (preferably electric).
- Sander.
- Serrated knife, hammer, screwdriver.
- Primer, paint.
In addition, we will need an old coffee table of any shape and size. For example, such as in the photo:
Stages of the work:
In order to modernize the old coffee table and turn it into a new banquette, initially you should unscrew the fixing screws and remove the top cover from it. This should be done as shown in the photo.
- Now we turn to the processing of the upper part of the future banquets. To do this, take a sheet of plywood 1.5 cm thick and attach a foam plate 5-6 cm thick to it. The dimensions of the foam sheet should be 1-2 cm wide in width than plywood. You can cut pieces of material of the desired size with a serrated knife.
- We cut a layer of cotton wool. It should be made 5-6 cm longer and wider than the foam layer. This is necessary in order to be able to wrap the countertop with the remaining edges of the material.
- We cut the sheathing fabric. The dimensions of the material should be 5-6 cm larger in order to be able to wrap the edges of a sheet of plywood and foam.
- We fasten all the layers of the upper part of the bench with each other. Initially, plywood comes, we put foam on it, then cotton wool. Then we wrap everything with a sheathing fabric.All parts are fastened together with aerosol glue. Then let the layers dry for a while.
- Cladding fabric all parts of the structure should be tight enough. Then we fix the material on the back of the countertop using building brackets. Particular care should be taken when machining structural angles. To make them even and straight to fix the fabric, use 2-3 staples at each corner.
- Now we turn to the processing of the lower part of the bedside banquets. To do this, we carefully grind the old coffee table without a countertop. To do this, use a manual grinder with a grain size of 120 and a sheet of sandpaper. Both legs and side surfaces of the structure are well grinded.
- Next, primer the lower part of the polished frame. This will require any water-based primer. After which we give the mixture to dry thoroughly.
- Then paint the frame. You can use spray paint of any color. That the coating was uniform and uniform, apply the paint in 2-3 coats. That's all, the bedroom bench is ready.
Diagram and drawing for the hallway
Before proceeding with the manufacture of banquets, it is necessary to consider its design, dimensions and manufacturing materials
Take into account the size and design of the hallway in which the furniture will be located. After that, a drawing of the future furniture item is created.
You can do it in various ways:
- by hand with a pencil and a piece of paper,
- using special computer programs,
- using the finished drawing found on the Internet.
Each individual option has its own advantages.
Help: calculating the dimensions of a banquette, it is worth starting from the fact that for one user a site measuring 45 by 55 cm is needed.
How to make at home?
The process of making a banquet with your own hands is as follows:
- First, the legs are made of timber. They will be attached to the frame of the product with screws and corners.
If possible, it is better to process the timber with a manual milling cutter. Then it will be possible to make original protrusions and products will turn out more exclusive. It is recommended to paint the timber with a stain or paint.
Tip: you can close the rough finish on the back of the product with textiles. A piece of fabric cut in size is simply sewn along the edge to the bottom of the banquet.
This we have considered the simplest option for the manufacture of banquets, which even a beginner in carpentry will cope with. This model is characterized by operational assembly time, aesthetic appearance, ease of operation.
Decorating workshop
As for the finish, it all depends on the materials of the banquet. Metal frames are treated with anti-corrosion compounds, protected and varnished or painted.
Wooden products are also treated with antiseptics, and then covered with varnish or paint in several layers.
As for the upholstery of the product, the color of the textile must be chosen according to the general interior of the room. When using buttons as a decor, they are selected according to the color of the upholstery material. Their number depends on personal preferences.
To make the banquet more practical, it can be ennobled with a removable cover. So it will be much more convenient for you to maintain a clean and tidy look of a piece of furniture
Important: for luxurious classic styles, empire or rococo upholstery of the banquet can be done using the carriage coupler technique. This decoration option looks presentable and noble.
Tip: in the hallway you can also make a wardrobe or wardrobe
And next to the banquet a small coffee table will look great.
Step 4: Leather
Lay out your leather or fabric blank. Measure and adjust the dimensions for the body of the banquet (top and sides). On each side you need to add 2-3 cm in reserve.
We cut the workpiece according to measured dimensions and are engaged in its adjustment if necessary.
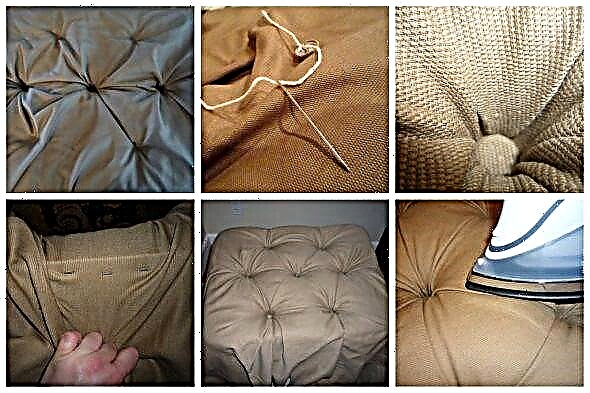
First, we begin to sew the upper piece of leather, and then sheathe the side parts. A special border will be sewn on each edge, which will add volume and transform our banquet.
Lay a layer of cotton over the foam. To create a smooth surface you need to release up to one and a half centimeters of length on all sides. Fasten the skin over the foam / cotton with the buttons. Continue to trim the bottom. Once this is done, you can remove the buttons.
Now you can simply protrude the protruding edges with a stapler and staples.
We sew a cover
The soft seat model can always be updated. To do this, it is enough to change the coating or sew a cover. And if the first option requires effort and some experience, then the second is just the ability to scribble on a sewing machine.
A cover with ruffles is sewn for a banquette without a back and armrests, for example, 45 * 45 cm in size. They use a variety of fabrics for this, but it is desirable if this product does not have the intended purpose, for example, for a wedding interior, to choose materials that are resistant to wear.
On the fabric mark and cut a square or rectangle of the appropriate size - the size of the seat.
The square is folded with a scarf, measured along the fold line at 10 cm. Lay the perpendicular to the side of the triangle and embed. The same operation is repeated on the other hand.
The resulting cloth box cut corners and edges and process.
A piece of fabric with a width equal to the height of the bench is sewn with a pipe. The length of the segment depends on the number of assemblies that they want to see on the finished case. The rim is swept to the seat, draping it evenly. Sweep from the wrong side.
The seam is covered with an elastic band - a regular stitch or zigzag, while the elastic should be stretched as much as possible.
The edge of the cover can be sewn up or trimmed with tape or tape. From the front side over the seam under the seat, you can also fasten the tape or decorative cord.
To sew a cover on a bench with your own hands will help the photo patterns below.
Photo of covers for a bench
Making a banquet is not a big deal. And everyone can arrange it to their taste. The main thing is not to get carried away and remember that this furniture is intended for the entrance hall in the apartment, and not at the exhibition.
The following video will help you to sew a cover for a banquet on the example of a chair:
Benefits of a DIY Bench
A banquet can be done by anyone who has minimal carpentry skills and good needle skills.

Often the basis of the product is really a stool.
Such a product looks very decorative, and making it quite simple.
Consider the advantages of a homemade puff.
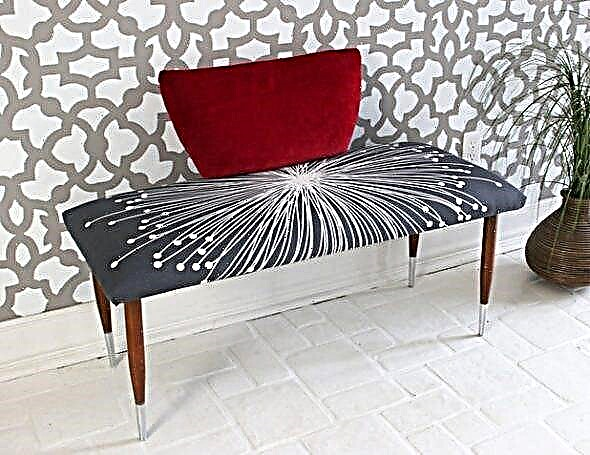
- Firstly, you can independently choose the shape, color, size to your liking. It all depends on your imagination. Then you can create a banquet, unlike other factory analogues, which will add originality to your interior.
- Secondly, a do-it-yourself pouf will cost you much less than a ready-made one from a store.
- Thirdly, you can make a banquet from old furniture that you were about to throw away (a stool, a coffee table), but in this way give it a new life.
- Fourth, the creation of something useful and beautiful always brings moral satisfaction to the creator. Having done such a thing on your own, you will be able to present your works to guests and receive many compliments, as a reward for your work.
A larger banquet, if the hallway dimensions allow, is no less simple to produce.
A fragment of the desired size is cut out from the selected fabric with an allowance.
Before you begin, you need to think through the design of the product and see what types are. The bench can be selected in shape, material and size.
This will require minimal carpentry skills and the ability to hold a needle and thread.
It is recommended to first lay the burlap and similar coarse material on the bottom, and then fix the foam - on glue or a stapler.
Consider the main types.
More suitable for the interior in the Baroque or Empire style. The product will have forged, twisted bases. More often, these instances do not have built-in shelves, drawers and cabinets. A pouf made in this style will look best in the hallway.
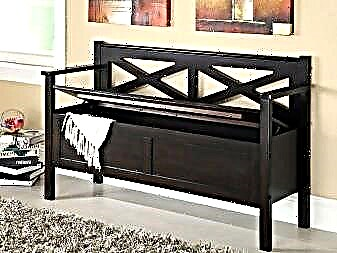
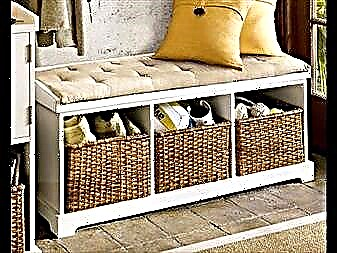
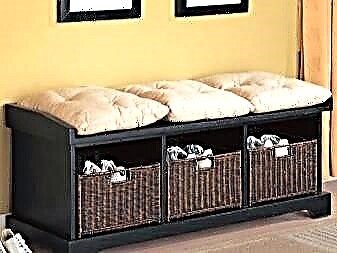
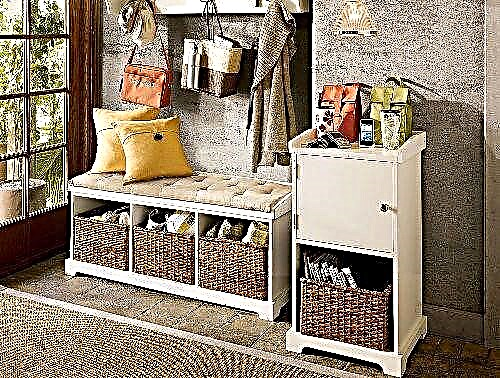
These types of products are often very functional: with built-in drawers and cabinets. They will look great in the hallway, kitchen or living room.
This small sofa will immediately create an atmosphere of comfort, especially if it is decorated with soft pillows made in the same style. This is the most comfortable and convenient option.
This type is more functional: it can be quickly disassembled. All elements are bolted. Therefore, for quick disassembly of the product, the design will be ordinary and not bearing decorative functions.
Very useful copy for the entrance, which will save space.
“Raw materials” for the product are wood materials.
For a soft seat, a fragment of foam rubber of the required size is cut out.
To make a banquette, you must also familiarize yourself with the types of upholstery that can be used during work.
The banquette can be covered with silk, cotton, linen. Textile poufs are unpretentious in leaving. A variety of shades is an advantage of such upholstery.
This material is not suitable for every interior, but it will look very expensive and elegant. Among the shortcomings can be distinguished high price, difficult care.
This option is cheaper than the previous one. It will look as noble as a puff made of genuine leather. At the same time, faux leather is not moody in the care. Although its service life is much shorter than that of a natural “brother”.

Forged models or furniture with an iron frame will require much more serious skills and experience.
The easiest way to make a banquette is from old furniture or from wood, as forged models and having an iron frame will require more serious skills and experience from the master.
The filling material, as a rule, is foam rubber - it is quite elastic and holds its shape for a long time.
An attractive look for the legs will provide the use of a hand mill.
Necessary materials
To work you need to have the following materials.
- For a pouf with legs, you will need a wooden beam - 30 * 40, 30 * 50 mm. or, if available, you can use old screw-in legs from a stool, table or bench.
- Plywood.
- Fixing materials: staples for staplers, screws.
- Varnish, stain or paint.
- High foam rubber.
- Cloth or leather for a close-fitting.
- Fabric for finishing the invisible side of the seat.
- Buttons
- Cloth for cover (if required).
If a very soft seat is being constructed, especially with a carriage screed, then in addition to foam rubber, a synthetic winterizer is also used.
If a model with legs is implemented, then 4 wooden planks are attached to the bottom so that they protrude 1-2 cm beyond the edges.
What materials will be needed?
Almost any person can make a banquet with their own hands. It is better for a beginner in this business to start working with wood, and not with iron, since with such material it is much easier. Wood materials will not require professional skills or significant experience. For the frame, you need wooden material - for example, chipboard or plywood. If the product will stand on its legs, you will have to purchase wooden blocks. Their size depends on how high the master plans to place the bench. Ready-made legs can be bought at the store or unscrewed from an old stool.
It is necessary to fix the structure with the help of furniture corners, self-tapping screws and glue. Foam is used for the filler, and for the upholstery - any fabric you like. But you need to understand that the fabric must be wear-resistant and very durable so that it does not fray over time. If a carriage screed is planned, then it is better to use not only foam rubber, but also a synthetic winterizer.
Tools required:
- drill,
- a screwdriver suitable for the selected screws,
- furniture stapler,
- sewing machine,
- screwdriver
- sandpaper,
- furniture varnish.
The main stages of preparation
You can start work only after creating a drawing of a banquet. Many may think that it is not needed, because the product is simple and does not require many structural parts. However, a drawing will be needed to determine product parameters and compare them with the dimensions of the room in which it will be located. When choosing the type of product, it is better to dwell on a simple option. It is harder and longer to assemble a bench with a back or with a drawer, so for the first time you need to confine yourself to a simple design. Having decided on the model, you need to draw a sketch. It is necessary to note on it all the elements and their sizes. Details from the tree are cut with a jigsaw, the bumps are rubbed with sandpaper. Then they can be varnished.
Unusual ideas
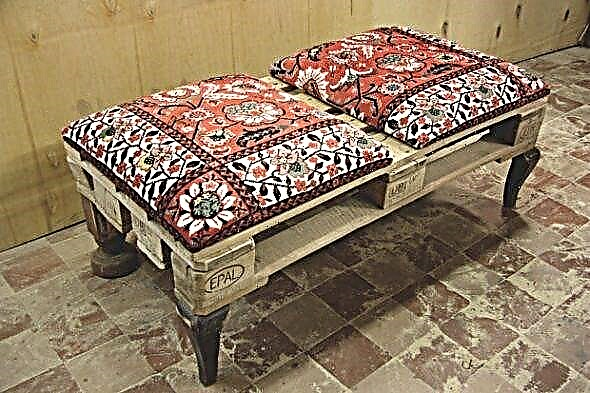
Talented craftsmen have long been using old products to create new pieces of furniture that have either deteriorated or simply lost their relevance. Therefore, it is not necessary to create a product from scratch, you can restore an unnecessary coffee table or stool. The main thing is that there should be enough fantasy. An interesting option for creating a banquet is using an old wooden box. To do this, remove the locks and hinges from the box. If there are any irregularities, they need to be sanded. The box itself can be painted in a bright color, and the lid can be covered with leather (previously - with foam rubber). Inside the box, you also need to clean up: sand and paint.
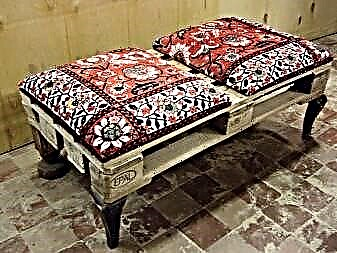
A banquet from old chairs will look original. To do this, take two backs of chairs with rear legs and connect them using two bars. You need to fix the bars with corners and screws. Then they make a seat out of plywood and sheathe it with foam rubber and fabric. A bench made of plastic bottles is the trend of this year. For the manufacture of such a product will need to prepare about 40 bottles, cardboard, tape, glue and foam. The bottles are fastened together with adhesive tape, and then glued to cut cardboard from two sides: on the lower and upper parts. After that, the structure is pasted over with foam rubber and fitted with its fabric. An old shoe shelf may become a multifunctional product. To do this, it must be sanded and painted. Then, at the top, you need to make a seat from a sintepon pillow, which is previously placed in the cover and attached to the shelf.
Necessary tools
To work, you must have the following tools:
- drill, screwdriver,
- screwdrivers
- hammer,
- construction stapler
- sandpaper of different stiffness,
- manual cutter (if the base of the pouf will be from the beam),
- level,
- thick threads and a large needle,
- scissors,
- roulette,
- a piece of chalk,
- sewing machine (if you need to sew a cover).
In addition, paint or stain and varnish may be needed.
The seat is cut out first - its dimensions serve as a starting point, and all other parts are adjusted under the seat if necessary.
If you do not have enough experience in the manufacture of furniture, then the whole process is better to split into several days, so that every detail is given due attention.
Step 1: Finishing the Feet
If you have ready-made screw-in legs, they must be restored. With sandpaper we clean the surface. Then apply new paint or varnish and stain. It is better to apply in two layers.
If you do not have ready-made legs, then they must be made from timber. They will be attached to the seat using self-tapping screws and angles. If possible, it is better to process the beam using a hand mill. Such a tool can make non-standard protrusions, and the product will turn out to be more interesting. We also cover the timber with stain or paint.
Step 2: Plywood and Foam
It is necessary to cut the foam of the right size around the plywood. At the same time, it should protrude 2-3 cm on each side. We select the sizes individually.
Step 3: mark the plywood
Glue the foam to the plywood, placing the glue closer to the edges. With the help of a tape measure and chalk, we will draw a markup on which we will continue to sew buttons. We make several holes in the plywood at the same distance. At the same time, we try not to hurt the foam rubber.
Step 4: We assemble the product, sheathe with cloth or leather
Cut a square or rectangle of leather or fabric in the shape of the product. It is necessary to carefully calculate the dimensions of the upholstery and fit them under the seat, leave a margin of 2-3 cm on each side.
Next, you need to carefully wrap the fabric and secure with a stapler.
You can proceed with the installation of buttons. Using a needle, thread the thread first into the button, and then bring it into the hole in the plywood under the seat. For better fixation, you can fix the thread with brackets.
It is necessary to close the rough finish on the back of the seat with a textile cloth. Sew the cut piece along the edge of the lower part.
If the legs were from another product, then we select the place of their placement, we fasten the screws of their base and screw them in. We fix the legs of the timber with the help of screws and corners to the seat.
The process consists of several stages. All of them are quite simple to implement and require only accuracy and due care.

It is not recommended to make all the necessary details at a time, especially if the first experience in furniture production.